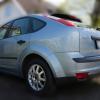
Mr_Spock Posted May 27, 2013 Share Posted May 27, 2013 Hi, last year I did a complete stereo installation in my 2005 Focus MK2. I am from Norway, so please excuse the bad english :) And the metric system :) I was very dissapointed with the sound quality in the car. The Head-Unit, Ford CD6000 suffer from a combination of poor dynamic resolution and lack of power - resulting in very bad sound quality. Even replacing it with the cheapest aftermarket cd-players will give you a great improvement in sound quality. I started with a plan on only change the head unit, but somehow it really took off. It ended with a complete stereo installation, including reinforcing the electrical system and sound dampening. At the same time I wanted to make the installation not showing - except for the head unit. I wanted to have good bass, 2x12" woofers in the back, but I use the space there on occasion, so the box had to be easily removed. The choice of components where made of good buys at the time - and Infinity is an old favourite of mine. Start of with some pictures of the finished installation: 3 Quote Link to comment Share on other sites More sharing options...
Mr_Spock Posted May 27, 2013 Author Share Posted May 27, 2013 Schematics showing stereo components and electrical reinforcements: (3-veis aktiv deling: Means 3-way Active Network, it means that crossover for each speaker are built in the cd-player and can be adjustet on the unit. It also require that you have one dedicated amplifier channel to each speaker, except for the woofers in this case - as they preferable are driven in mono. The benefit are that you can adjust many more sound parameters. The unit also includes auto set up (with included microphone) for soundlevels, speaker distances, equlizer and crossover parameters - if you don't want to do it manually) Original sizes shown in parentheses. More to come.... :) 3 Quote Link to comment Share on other sites More sharing options...
Mr_Spock Posted May 28, 2013 Author Share Posted May 28, 2013 First: tweeters and woofers in the front doors: I started with checking the size of the stock tweeters, the panels they are built in to, are easy to take off: Just a little photoshop trick to show 3 versions of one panel :) 2 Quote Link to comment Share on other sites More sharing options...
Mr_Spock Posted May 28, 2013 Author Share Posted May 28, 2013 With these measurements, (and for the woofer) I startet looking for a 2-way component speaker system. Not to many systems describes the size of their tweeters in specs on the internet. But I was happy to find the Infinity Kappa Perfect 6.1 system - meeting the requirements - both in size and good reviews. Using rubber tape to make perfect fit (I used some hot glue too) Like a gloove :) Next, the woofers 2 Quote Link to comment Share on other sites More sharing options...
Mr_Spock Posted May 29, 2013 Author Share Posted May 29, 2013 To remove the inner door trim panel, there are 2 bolts hidden behind the lower part of the grab handle, the rest are retaining clips and disconnecting of electrical connectors. Using Haynes Workshop Manual will be helpful. No screws - strange way of fitting Speakers... I measured the height of the adapters: I used pliers to help remove the speakers: Backside of the stock speakers: 2 Quote Link to comment Share on other sites More sharing options...
Mr_Spock Posted May 29, 2013 Author Share Posted May 29, 2013 I found speaker adapters on eBay that fitted well: Now it was possible to measure max depth for the woofer, I lowerer the window to "worst case scenario" : There was still som air between the inner trim panel and the speaker, using only the adapter - I had to build the adapter higher to get a perfect fit: 2 Quote Link to comment Share on other sites More sharing options...
Mr_Spock Posted May 29, 2013 Author Share Posted May 29, 2013 At this point I had not decided on which head unit to buy. I decided to place the included crossovers somewhere in the dash. With that in mind, I decided not to use the original speaker wiring, And increasing the size of the wiring will benefit sound quality. Getting the wiring to the dash was difficult, I ended up using the rubber-hose and going through some holes that was not in use. The wiring connected to the crossovers in the dash. Later when I chose to go for 3-way active network and amplifiers - these where not used. Finished door: For a while, I used these Speakers with an old Pioneer 4x50W cd-player - and the sound was truly fantastic, compared to the old system. I really loved how easy it was to work on the Focus. And I began thinking of using amplifiers and maybe getting a subwoofer. Fascia and wiring loom was bought on eBay - uk sellers. 3 Quote Link to comment Share on other sites More sharing options...
Mr_Spock Posted May 30, 2013 Author Share Posted May 30, 2013 As mentioned, I was really happy with the new stereo installation. But thoughts on how it would sound with a couple of amplifiers and a good subwoofer kept me thinking. I have not installed such a stereo system in a car before, and almost all installations I have seen, have left the luggage compartment close to unusable. And I did'nt want this. After a lot of thinking and searching on the net, I came up with a solution that would give me both high sound quality and a luggage compartment to use.All those car-stereo places I visited, mentioned the big improvement in sound quality - with sound dampening. My Focus had a really big problem with road noise, even with summer tires, it's a big problem. And in the winter season I use these tires:Better sound quality and lowered road noise - yes I wanted that!So taking apart the interior next, starting with the most important, the front doors:Draining channels in the bottom of the doors were close to not function, because of this slimy goo, it smelled too. All the doors had the same problem. No wonder car doors rust at the bottom. Properly cleaned:The sound damping mats I used, I bought from a local shop, they are heavy. About 3kg/sq.m. In total I used 16 sq.m - a total of almost 50kg. Very easy to work with, just remeber to clean surface properly.Put on multple layers behind the speaker:The inner panel:Taking the doors apart are easy, but using the Haynes manual is recommended. I lubricated all the moving parts I coud reach. The locking mechanism and power windows working as smooth as ever. And the feeling and sound of closing the doors!!! No more "boiiing" bucket sound when closing doors - more like an old luxury car with a elegant low click. And you can barely hear the central locking operate - I now have to look at the blinking lights to ensure the car locks when using the remote.Back doors getting the same treatment:Just by doing this, the road noise were significant lowered. The sound quality improved too - especially to a tighter, harder bass - just how we like it :) 2 Quote Link to comment Share on other sites More sharing options...
Mr_Spock Posted May 31, 2013 Author Share Posted May 31, 2013 I have been visiting this fantastic forum for a couple of years, and found a lot of great mods that I have installed in my focus - especially LEDs : The footweel, the ignition ring and glove compartment, Blue car - blue LEDs: When I had the doors taken apart, I took the opportunity to install mods there too: LEDs in the mirror housing and Ford Logo Puddle lights :) 2 Quote Link to comment Share on other sites More sharing options...
Mr_Spock Posted May 31, 2013 Author Share Posted May 31, 2013 Back to the sound dampening, as expected there was very little sound dampening installed. The roof: The luggage compartment, the wheel housing without any sound dampening - no wonder my car is noisy :) Sorted - with multiple layers especially on the wheel housings: I used the opportunity to improve the lighting here too - white LEDs on both sides: 2 Quote Link to comment Share on other sites More sharing options...
Brigante Posted May 31, 2013 Share Posted May 31, 2013 great guide dude you should be able to help me with summin once i've got the door card off, how do i remove the inner metal panel off once i've removed all the 10mm bolts? whats holding it on from behind? i need to take it off to access to have a butchers at my driverside central locking mechanism but summin else is holding it on from behind and i'm not sure what Quote Link to comment Share on other sites More sharing options...
gurcayy Posted May 31, 2013 Share Posted May 31, 2013 Great job with great guide! Congratulations, buddy... I am sure it will be useful guide for the others who want the same :) 1 Quote Link to comment Share on other sites More sharing options...
Mr_Spock Posted June 1, 2013 Author Share Posted June 1, 2013 great guide dude you should be able to help me with summin once i've got the door card off, how do i remove the inner metal panel off once i've removed all the 10mm bolts? whats holding it on from behind? i need to take it off to access to have a butchers at my driverside central locking mechanism but summin else is holding it on from behind and i'm not sure what Thank you :) I really recommend getting the Haynes Manual to do the removal of the inner panel. But I will try to describe how to do it. Loosen the rubber grommits - the green ones - the opening handle wire can be easily removed form the opening handle. The red circles: the inner panel holds the power windows mechanism, with the window glass attach to it. First remove the rubber inner weather strip from the door. Remove the two rubber sealings in the red circles (glue them back on when tou're finished) lower the windows until you see 10mm bolts - looking in to the holes - loosen the bolts - then grab with both hands on top of the window glass (tilting it up at the rear) and carefully slide it up and out of the door completely. Blue circle - these 3 plastic plugs are holding locking mechanism - which are attach to the door. To loosen the locking mechanism you have to remove the outer door handle (and a bolt behind it) and the 4 bolts at the end of the door. I have not done this - I did carefulley remove the 3 black plastic plugs just to get the inner panel off. Hope this helps you. 3 Quote Link to comment Share on other sites More sharing options...
Mr_Spock Posted June 1, 2013 Author Share Posted June 1, 2013 Great job with great guide! Congratulations, buddy... I am sure it will be useful guide for the others who want the same :) Thanks mate :) 1 Quote Link to comment Share on other sites More sharing options...
Preee Posted June 1, 2013 Share Posted June 1, 2013 Very good guide Mr Spock , and fantastic pictures , i would imagine the sound quality inside your car have doubled. 2 Quote Link to comment Share on other sites More sharing options...
Mr_Spock Posted June 1, 2013 Author Share Posted June 1, 2013 Very good guide Mr Spock , and fantastic pictures , i would imagine the sound quality inside your car have doubled. Thanks, it's hard to describe the improvement in sound quality in words - but jaw dropping will do :) 2 Quote Link to comment Share on other sites More sharing options...
Mr_Spock Posted June 1, 2013 Author Share Posted June 1, 2013 More sound dampening - out goes the seats: The rubber mat at the front is difficult to remove - I just placed damping mats as far up under as I could: Some other places got treatment too: Behind the windshield wipers: The underside was treated (wheel houses especially) with about 20kg of combined anti corrosion and noise stopping coating: 2 Quote Link to comment Share on other sites More sharing options...
Mr_Spock Posted June 1, 2013 Author Share Posted June 1, 2013 I took the opportunity to give the floor mat a real wash using foam lance and high pressure washer: 2 Quote Link to comment Share on other sites More sharing options...
Mr_Spock Posted June 2, 2013 Author Share Posted June 2, 2013 Having all sound dampening done - it was time for dealing with cables and stereo compononents. At this time I had decided to use two amplifiers: one 4-channel feeding the 2 way component Speakers in the front doors - and one mono amplifier to feed a subwoofer. Speakers in the rear doors will not be in use. Both amplifiers and subwoofer will be placed in the luggage compartment. With this in mind - I knew were all cables had to be placed. I did voltage drop calculations on the power cables feeding the amplifiers - to ensure maximum perfomance. To get through the bulkhead, I went through a big, roomy cable rubber grommit already in place, in my car (with the steering wheel on the wrong side :) ) it's behind the glove compartment. Here comes a useful tip - do not place cables on top of the sills (marked red) - do the ekstra job and take out the seats and carpet (takes about 30 minutes or less) and lay them the along with the original wiring (marked green). A little longer way, but no problem with space or conflicting with plastic panels etc. Putting power cables on one side - and rca/signal cables on the other - also minimize interference. 2 Quote Link to comment Share on other sites More sharing options...
Mr_Spock Posted June 2, 2013 Author Share Posted June 2, 2013 Grounding the amplifiers demands really good connection - using the seatbelt bolts are a good solution when placing the amplifiers in the back. I use one on each side, doing separate positive power cabling to each amplifier - I do the same for the negative power: Sanding paper helps to get a clean metal surface, on bolts, seat belt and bodywork: Finishing with a proper electrical/anti corrosive spray: 2 Quote Link to comment Share on other sites More sharing options...
Mr_Spock Posted June 3, 2013 Author Share Posted June 3, 2013 The amplifiers I bought are not too powerful, but will put a strain on the electrical system in the car. I decided to reinforce the main parts - the battery and the connections between battery, generator and the bodywork. Over dimensioning is always a good thing. The original generator gives 105A - wich is pretty good. A Ford Motorcraft 52A Cadmium battery, fitted from the factory, was still in the car. When removing it, I discovered a removeable distance "thingy" , that when removed - would give place to a bigger battery: I measured the empty battery box and went to my local "cheap-but-good-quality-car-parts" shop and found the biggest battery that would fit, and have the correct layout to fit car terminals. I found a 75Ah Silver Cadmium (important to use with the Focus Smart Charge system) that fittet perfectly. To make the system more robust to higher amps - I just found cables that were as thick - or thicker - as the originals - and connected them in parallel. These are found very cheap and already terminated in all sizes on Ebay: I also laid a well over-dimensioned + cable for the Head Unit. All + cables with proper fuse mounted close to the battery. Cable collector: 2 Quote Link to comment Share on other sites More sharing options...
Mr_Spock Posted June 4, 2013 Author Share Posted June 4, 2013 Finished with all cables and dampening - it's back to stereo components, starting with the subwoofer. Being very satisfied with the Infinity Speakers in the front doors - I choose to use 2 of their 120.9W 12" subwoofers. Reading the specs, I found a sealed enclosure would fit me better than an ported - smaller and flatter frequency response (better sound quality). Found a pre-built sealed enclosure meeting the exact volume specs from Bassworx: The enclosure had Push post terminals pre-installed for easy disconnecting of the cables: Installed carrying handles, on both sides, to make it easy to carry the box in and out of the luggage compatment: 2 Quote Link to comment Share on other sites More sharing options...
Mr_Spock Posted June 5, 2013 Author Share Posted June 5, 2013 I had decided on a 2 amplifier configuration - one powerful mono amplifier for the subwoofer - and one 4 channel for the Speakers in the front doors. With this configuration, I would have the opportunity to use 3-way active crossover setup. A dream come true - for a hifi interested fellow like me - but head units including this feature, are usually way to expensive for my wallet. Anyway - with this cable and amplifier configuration - I could choose all possible setups. After a lot of measuring and browsing the net for suitable amplifiers - I found the Infinity Kappa series amplifiers being a good choice - mostly for their small size and shape. Being class D amplifier technology, they generate less heat and increased effiency, giving a compact design. I was happy to se that they fitted very well under the plastic panels on each side of the luggage compartment - cables already laid it was an easy job: Here is the Infinity Kappa One for the subwoofer: And the Infinity Kappa Four for the front door speakers: To prevent short-ciruiting of the subwoofer speaker cables - when the the subwoofer is removed from the luggage compartment: I installed an on/off switch for the subwoofer amplifier: I am very happy with the result in the luggage compartment: 2 Quote Link to comment Share on other sites More sharing options...
Mr_Spock Posted June 6, 2013 Author Share Posted June 6, 2013 Now, there is only one thing missing - in this "Complete Stereo Installation" - the Head Unit! Halfway in to this project, Pioneer presented a new cd-player - the Pioneer DEH-80PRS, offering 3-way active network/crossover etc - to a price fitting my budget. I could'nt be more happy :) It is an awesome sound quality unit. Having all the features I could wish for. Installing the unit in the dash was easy, bought a fascia with wiring loom on Ebay: I hooked it up with the steering column control, wiring and components for Ebay: Connecting in the rear of the head unit: Works great - even if I prefer to use the head unit controls. The unit have an Auto Setup funktion, were it adjusts sound parameters, using the included mic: Start the setup, leave the car, close the doors and wait 5 minutes until the display indicate it is finished: The result is fantastic, key fetures are setting the speaker distance perfectly - placing you in the sweetspot, adjusting to a pre set equalizer curve, autolevelling all amplifier channels - and setting up the 3-way active network for you. After the auto set-up you can manually adjust all parameters to your personal liking. I did some reading on the frequency range of all Speakers and did some adjustments, easy performed on the unit: There was quite a bit of adjustment going on - the first couple of months - as I played music, where some songs were to "boomy" and some to "thin" - but I did find a setup that was satisfying. Now I haven't adjusted anything for months. I havent explored any of the other features on the head unit, I believe it have bluetooth and radio?? :D I rip my favourite songs from my cd collection in 320kbps mp3, transfer them to a 32GB SD memory card (can hold about 5000 songs), put it in the memory slot hidden behind the display and choose random play. If I want to hear a special song or an album I easily navigate the librarys to find it. The stereo installation have now been in use for almost a year and have worked 100%. In the beginning I drove the car some times for no reason other than to listen to music, well I still do :D 3 Quote Link to comment Share on other sites More sharing options...
Mr_Spock Posted June 6, 2013 Author Share Posted June 6, 2013 And of course - i did install a Car Alarm: With a nice blue flashing LED: It connects with the cars can-bus circuit - so it turns on and off with the central locking - using the key fob. 2 Quote Link to comment Share on other sites More sharing options...


Recommended Posts
Ford UK Shop
Sponsored Ad
Name: eBay
Ford Model: FordUK Shop
Ford Year: 2024
Latest Deals
Ford UK Shop for genuine Ford parts & accessoriesDisclaimer: As the club is an eBay Partner, The club may be compensated if you make a purchase via the club
Join the conversation
You can post now and register later. If you have an account, sign in now to post with your account.