wingnuts Posted August 20, 2015 Share Posted August 20, 2015 Hello, Im a newcomer and interested in this excellent post. I just wondered if anyone has fitted the Garmin Wireles BC30 kit which switches a Garmin Sat Nav Display onto its camera display when reverse is selected. Looks pricey but as I have a compatible Garmin thinking of trying it but dont like the idea of fitting the camera to the number plate on the boot lid, your positions are much better but the Garmin camera does not look very adaptable. Thanks. Quote Link to comment Share on other sites More sharing options...
jace1969 Posted August 20, 2015 Share Posted August 20, 2015 Mine is the ford one which is under the boot chrome lip where you open the boot and in rear-view-mirror. It was on the car when i had it,aint the ford ones a lot just for the camera. Had a new one fitted free as it was playing up,would of been £200 just for camera,wish i had a link to the genuine ford ones so i could look at it myself but cant find one. Good thing. Quote Link to comment Share on other sites More sharing options...
wingnuts Posted August 24, 2015 Share Posted August 24, 2015 I looked into this Graeme because the higher camera positioning will give a more useful view than the black bumper position. Two snags. Finding a replacement lamp that included a camera was difficult, and if found the wiring would be a right pain. Wires would have to be threaded through the rubber loom tubes that bridge the top of the tailgate with the car body. Then one of those wires has to connect to the reversing lamp and the other has to end up at the instrument panel. Not easy. Fitting the camera into the bumper makes the wiring so much easier. Very interesting point this, I want to fit the Garmin BC30 but probably have to give up. 1) the Fiesta number plate (best position for camera if using Garmin main recommendation) means getting a wire from the reversing light up into the hatch top through the tubing etc as you said. Would be preferable as only a small hole would be need behind the plate for the camera wire and the rest straightforward but the wire feed very awkward. 2) Fit the camera to the lower body, very simple job this way but means drilling holes in either the lower black body panel or higher up in the metal part. Would the camera be effective from the low level section. Seems from the excellent advice given by you that other cameras are OK fitted here so maybe that would be the way to go in my case where I want to use the Garmin camera with my compatible Garmin sat nav mainly because there is no wiring involved through the car. Quote Link to comment Share on other sites More sharing options...
wingnuts Posted August 26, 2015 Share Posted August 26, 2015 Tom before are get into it are those wires very thin, been thinking about following your guide but using the smallest wire gauge ScotchLok because I have nowhere to use mains supply outside for my solder iron? Thanks Quote Link to comment Share on other sites More sharing options...
Baggi0 Posted August 14, 2016 Share Posted August 14, 2016 Im gonna for one one these soon thanks for the great guide and info guys. . Has anyone got a rear view mirror monitor and are they any good? I was thinking of getting one so it fits with the car more rather than having another screen in the car. Also does anyone have any recommendations on which camera to use? It's been a few years since this started so there may be a better option now. Thanks 1 Quote Link to comment Share on other sites More sharing options...
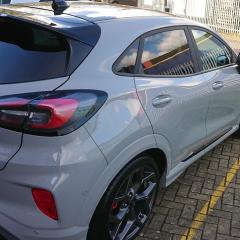
Baggi0 Posted August 18, 2016 Share Posted August 18, 2016 So i bought a camera and monitor at a cost of £19 and followed brownmotoring's guide with a couple of tweaks and thought i would post the results to help others. I found there was no need in taking the rear light off as you can just unclip the connector if you unscrew and pull off the trim near the light and take out the side carpet thing or whatever it is haha. The cable setup was the same, red to the blue reversing cable and black to the purple and black earth cable as shown. The white tape is where the soldered connections are the black tape was already the where the cable splits to another block so you'll have to take some off. I ran the cables as the guide says but went all the way down under the scuff plates, behind the glove box (cable tired) and with a little 4mm hole drilled in the front of the compartment the screen sits and it prised away a little you can thread the cables through so you don't see any cables at all. (i forgot to take pictures of that but it's only half a hole so you don't even notice when the screens out). These are the finished shots. I'm spraying the front and back bumper black as i'm not really a fan of the grey bumper, if not i'll just unscrew the top off the camera and paint it grey. Here's the links to the camera and screen i used. The camera comes with a hole saw and a mounting bracket as well if you want to do it another way so you have all the stuff you need other than a drill, tape, a soldering iron, copex and cable ties https://www.amazon.co.uk/gp/product/B01EHT2MWI/ref=oh_aui_detailpage_o00_s00?ie=UTF8&psc=1 https://www.amazon.co.uk/gp/product/B013AUMTBO/ref=oh_aui_detailpage_o00_s00?ie=UTF8&psc=1 i'm very happy with it for the price, thanks for the guide brownmotoring 2 Quote Link to comment Share on other sites More sharing options...
jace1969 Posted August 19, 2016 Share Posted August 19, 2016 13 hours ago, Baggi0 said: So i bought a camera and monitor at a cost of £19 and followed brownmotoring's guide with a couple of tweaks and thought i would post the results to help others. I found there was no need in taking the rear light off as you can just unclip the connector if you unscrew and pull off the trim near the light and take out the side carpet thing or whatever it is haha. The cable setup was the same, red to the blue reversing cable and black to the purple and black earth cable as shown. The white tape is where the soldered connections are the black tape was already the where the cable splits to another block so you'll have to take some off. I ran the cables as the guide says but went all the way down under the scuff plates, behind the glove box (cable tired) and with a little 4mm hole drilled in the front of the compartment the screen sits and it prised away a little you can thread the cables through so you don't see any cables at all. (i forgot to take pictures of that but it's only half a hole so you don't even notice when the screens out). These are the finished shots. I'm spraying the front and back bumper black as i'm not really a fan of the grey bumper, if not i'll just unscrew the top off the camera and paint it grey. Here's the links to the camera and screen i used. The camera comes with a hole saw and a mounting bracket as well if you want to do it another way so you have all the stuff you need other than a drill, tape, a soldering iron, copex and cable ties https://www.amazon.co.uk/gp/product/B01EHT2MWI/ref=oh_aui_detailpage_o00_s00?ie=UTF8&psc=1 https://www.amazon.co.uk/gp/product/B013AUMTBO/ref=oh_aui_detailpage_o00_s00?ie=UTF8&psc=1 i'm very happy with it for the price, thanks for the guide brownmotoring I got to say that's good,if i didn't have one in my mirror this would be the one i would try,looks spot on. Quote Link to comment Share on other sites More sharing options...
Baggi0 Posted August 20, 2016 Share Posted August 20, 2016 On 8/19/2016 at 0:07 PM, jace1969 said: I got to say that's good,if i didn't have one in my mirror this would be the one i would try,looks spot on. Thanks I was thinking of getting of getting one for the mirror but most were clip on ones and were quite big. The reviews weren't very good on them either. If i could have got a proper Ford one i'd have gone that route tbh but i couldn't. I'm more than happy with the final results of this though. Quote Link to comment Share on other sites More sharing options...
jace1969 Posted August 21, 2016 Share Posted August 21, 2016 Mine is the ford one as it was fitted from new when the other person had the car but i like that one with the screen. Quote Link to comment Share on other sites More sharing options...
Theshed Posted September 13, 2021 Share Posted September 13, 2021 On 8/6/2013 at 10:13 PM, tomroscoe said: http://cgi.ebay.co.uk/ws/eBayISAPI.dll?ViewItem&item=290916053159 £9.28 delivered http://www.amazon.co.uk/dp/B006MPRFJQ/ref=pe_385721_37038051_pe_217191_31005151_M3T1_dp_1 £15.48 delivered. And they wire together beautifully Neat installation. I followed your links and was a bit confused as to which Model I preferred ! 😋 Quote Link to comment Share on other sites More sharing options...


Recommended Posts
Ford UK Shop
Sponsored Ad
Name: eBay
Ford Model: FordUK Shop
Ford Year: 2024
Latest Deals
Ford UK Shop for genuine Ford parts & accessoriesDisclaimer: As the club is an eBay Partner, The club may be compensated if you make a purchase via the club
Join the conversation
You can post now and register later. If you have an account, sign in now to post with your account.