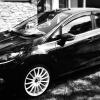
thomas.wesley Posted November 7, 2014 Share Posted November 7, 2014 I've had my Mk7 Fiesta for a little bit under 6 months now and I've finally have decided to make a build thread from the day that I picked it up the 16/05/2014 to now and for what ever modifications come after!I went and inspected the car on the 12/05/2014 at used car dealer in Melbourne (Capital City in Victoria Australia) and I was immediately hooked! I had the choice from either a Black WT Zetec which I had inspected earlier in the day or the Phantom Blue WT Zetec, (both Asian versions) and the rarity of the Phantom Blue immediately caught my attention. I had only seen about 3 on Victorian Roads since they were released so my choice was clear! The day I inspected and purchased the car. After cutting a few deals with the salesman I managed to knock the price down and get four brand new tyres put on with a replacement tow cover as the original was missing before i picked it up 4 days later. I went home that night and immediately ordered some new bulbs for it. Some super bright reversing lights and everything else needed for the front but in white. This is the new Fiesta the day that I picked her up. As soon as the new lights arrived I put them in so I didn't have to deal with the horrible yellowish stock lights!Unfortunately I don't have any photos documenting this but if requested I am able to show a comparison.Next thing on my to do list was pick a name for the little beast and the get some protection for her!So I fitted some weather shields and a bonnet protector about a week after I got her! And I decided on a name something close to her heritage. Phantom. Off to work now but I post some more later! - Tom Quote Link to comment Share on other sites More sharing options...
afrocleland Posted November 7, 2014 Share Posted November 7, 2014 Chrome grill vents are nice, but I'm really unsure of that black thing attached to the bumper. What and why is it? Quote Link to comment Share on other sites More sharing options...
thomas.wesley Posted November 7, 2014 Author Share Posted November 7, 2014 It's a bonnet protector to protect from stone chips, don't worry you'll see me remove if you keep following the thread as I post more! Haha Quote Link to comment Share on other sites More sharing options...
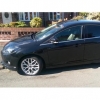
thomas.wesley Posted November 7, 2014 Author Share Posted November 7, 2014 So next up on the modification schedule was to change the wheels to a more appealing stealthy colour. BLACK! Unfortunately I had little money at the time and had to budget how I was to make it look nicer. So a spray on Plastic coating was my go to option. Plain Ol' stock wheel Plasti-Dip applied to one wheel. Put back on The Phantom And the Final Reveal! Fairly Happy with the results I went for a drive to show them off to anybody who cared! Also found Phantom's little cousin when shopping! (Lower Spec Model) I also picked up a product called F1 Waterless Wash and Wax, and god did it make my car sparkle! I only use this now for little cleaning touch-ups and always keep a can of it in the boot! No more than a month after putting on the Plasti-Dip it had to be removed so that another tyre could be fitted. This is what happens when you have to swerve in to a Storm Water drain to avoid people that don't know which side of the road that they belong on.I was very surprised that I didn't get a cracked rim! or even a buckle! The impact of the drain send a loud and painful shudder through my poor Phantom. :( Time to get some sleep, it's 4:10am here in Australia and I'm exhausted after just getting back from work! I'll upload some more progress later on today when I'm fully awake!- Tom Quote Link to comment Share on other sites More sharing options...
thomas.wesley Posted November 8, 2014 Author Share Posted November 8, 2014 I was constantly cleaning my car and in Winter, house sitting down a 2 kilometer long dirt road wasn't exactly my idea of fun.. So mudflaps were my next purchase! I ordered a set of RokBlox for the Fiesta ST as the Zetec had the same rear flaps as the ST and nothing else is molded to fit the car. Putting them on required taking the wheels off so I was able to drill out some rivets and put some fittings in. But when I was finished I cleaned her down and took a few photos to show them off! I also installed a K&N Panel Filter and a K&N oil Filter as well, which marginally improved performance. But it did make the intake sound nicer! Stay tuned for more! :D - Tom Quote Link to comment Share on other sites More sharing options...
thomas.wesley Posted November 8, 2014 Author Share Posted November 8, 2014 So now it was about time to do a few more modifications. These included getting some spacers for the rear and front wheels and applying Plasti-Dip to my wheels again! So now the spacers!After researching for days and making sure I had the right PCD for my car online I went and bought myself some 4x10⁸ 15mm Spacers for my Phantom... And guess what! They didn't fit! It turns out that the WT Ford Fiesta (Thai made version of the Fiesta) has a PCD of 4x100. So I gave up on the spacers for now! The next part was Plasti-Dipping the wheels again. The black was too plain and didn't stand out as much as I would have liked it to. So with some advice from a friend I decided to spray them a nice Matte White. This colour change would have to be one of the best things I have done to the car and to what it leads on to! So I took my wheels off and masked everything off! Then started spraying! :D Making sure I masked everything off because removing white from a black wheel is one hell of a job! Put them back on the car and then stood back and admired! Unfortunately I ran out of time and could only do the front wheels. So I completed the rest on another day at a different place! In the meantime I had ordered some spacers from China from a site called Aliexpress and orded a set with the brand name TADEO I managed to cut a deal and get 4 spacers. 2x15mm for the front and 2x20mm for the rear with the exact hub centre of 54.1mm and PCD of 4x100 for $150USD Including shipping! They arrived (unfortunately I have no photos of this process) and I put them on the Phantom. I then gave her a Wash and Wax and took a few photos. Next up, playing with a bit o' Vinyl! - Tom Quote Link to comment Share on other sites More sharing options...
thomas.wesley Posted November 10, 2014 Author Share Posted November 10, 2014 Okay, so I've had some surgery on my toes today, so that means I'm going to be stuck in front of my computer and in bed for a week or two so I can finally post the rest of my Build thread! So I started on my vinyl work. I purchased some S1600 Stickers online and put them on. I didn't like the idea of having racing stripes all the way down the middle of the car. So I just stuck with the side door ones! A few days after I put this on a stupid large usually land based bird ran infront of my car which ended up cracking the already bad respray that the car had been tormented to from the last owner. Here is an example of what had happened to the paintwork when I was cleaning my car with a high pressure cleaner: So after the bird had cracked the paintwork I decided to get it finally fixed. Grill-less and looking sad! After that was all fixed up I started work on the vinyl again!And this was my inspiration: An image showcasing some Triple R Composite EyeLids From that image I cut some of the remaining vinyl into this: I also removed the bonnet protector on the same day, and you can see the mounting points on it where it used to be! But. I wish I had waited a week before I had removed it. No work than 5 days after I had the bumper resprayed some I idiot in a V8 flicked stones all over the front of my car whilst overtaking me at around 180km/h Not happy and still dealing with little white flecks in my bonnet and bumper. Next I removed the center filler part of the S1600 Sticker as I thought it looked a bit much on the Phantom. Then, and I wish I hadn't. I removed the bottom half of the S1600 Sticker. Then as per the norm. I her a wash and wax and took some photos! (with my unofficial mascot) Next up, Wheels, Stickers and Mudguards! - Tom Quote Link to comment Share on other sites More sharing options...
thomas.wesley Posted November 10, 2014 Author Share Posted November 10, 2014 Okay so this time I entirely removed the S1600 Sticker as it just didn't suit the car anymore. I also removed the Mud Guards too as it is coming into Summer here in Australia and I got them to primarily protect from the mud and grime that would layer itself on my car. Next was a big step up in my cars appearance. I finally bought myself a new set of wheels.Well not really new, second hand. But they came with a new set of tyres! I then sourced some hub centering rings and some slim-line lock nuts. Then removed the spacers and put the wheels on the Phantom! This is the result: Before: After: Next was a wash, wax and some more photos! The Triple R Composite treatment is next! - Tom 1 Quote Link to comment Share on other sites More sharing options...
thomas.wesley Posted November 11, 2014 Author Share Posted November 11, 2014 So this is my most current modification to the Phantom. I added some Gel Overlays to the Phantom. White and Black. from: http://www.domedbadge.co.uk/ Where you can make and customize your own badge from anything! You can see these better through-out this next segment. Now this modification is the Triple R Composite treatment. I ordered; TRC Eyelids: http://www.triplercomposites.co.uk/product/ford-fiesta-mk7-headlight-brows/ TRC RS Style Bonnet Lip: http://www.triplercomposites.co.uk/product/ford-fiesta-mk7-bonnet-lip/ and a TRC Fiesta Front Splitter: http://www.triplercomposites.co.uk/product/ford-fiesta-mk7-zetec-s-front-splitter/ After reading the fitment guide for the Eyelids it was pretty straight forward. All that was needed to do was take out the Headlight unit and install them with the eyelids over the top of them and stuck down into place with the 3M Adhesive on the back! Simple. With and without the eye lid. Almost as if the Phantom was winking at me... Other side installed. Lit up, and looking mean! Next up to go on was the RS Bonnet Lip I was sick of getting stone chips since removing the bonnet protector so I'm hoping that this will do the job and at lease give the car some style! Mock ups of where to put it and then I attached it the next day. The only issue I had with the Lip was that it wouldn't bend around the bonnet and fit on. So I ended up using some foam extra strong double sided tape I had laying around! (convenient hey!) and it stuck on no worries! The last TRC item I had to install, was the Front Splitter. The hardest job of them all. I even bought some axle stands especially to help me put it on. Unfortunately I didn't use them as they wouldn't fit under the Phantom. So it just installed them with my Phantom up on a jack. Then bought her down and took a few photos to showcase the Triple R Composite Modifications. (with extra bug splatters) I've made a guide on how to install the Triple R Composite Splitter for the Fiesta Mk7 which can be found here: http://www.fordownersclub.com/forums/tutorials/article/269-guide-installing-a-triple-r-composites-splitter-to-a-mk7-fiesta/ To help anybody out there that is having trouble installing the Splitter. That's everything that I have done up to date now. From now on I will be posting the Modifications of what I've done to my Phantom, as I do them. Next on the schedule, Painting the wheels Gloss White and changing the Red ring on the inside of the Wheel to a colour matched Phantom Blue! - Tom Quote Link to comment Share on other sites More sharing options...
thomas.wesley Posted November 16, 2014 Author Share Posted November 16, 2014 Over the weekend I set myself the task of repainting my wheels. I repaired them all on Thursday and removed all Gutter Rash and Gouges taken out of them by the previous owner of the wheels, then I prepared them for painting. Then I set to work painting them on Friday. I wanted to do them Gloss white with a Phantom Blue colour matched ring. Started off with the 2 Coats of Etch Primer (metal primer). Sprayed around the inside of the rim with 3 Coats of the Phantom Blue. Then I put some electrical tape over the Phantom Blue ring I wanted to keep, then sprayed them with 2 Coats of Enamel Dupli-Colour Quick Dry White. Not sure how I feel about Enamel paint at the moment as it seems like it's going to take a very long time to cure and harden. I then let that dry for a while and removed the electrical tape covering the Phantom Blue. Next I hit it with 2 coats of clear and let it dry. Now back from the city Sunday and this is what they look like! So because today is now Sunday and it has been 2 full days since I sprayed them. I'm new to painting things, I even bought myself the Spray Gun to do all of this project with! The issue now is the Enamel Paint. How long do I have to wait until the paint is fully cured and I won't have to worry about anything happening to it when put to use. At the moment the wheels are dry to touch, but if i press hard enough against the paintwork I can see the dent in the paint left by my finger. (tested in unseen place) Hoping someone might be able to tell me how long I have to wait until I can swap them back on to my car and get those stock wheels off it! Cheers! - Tom Quote Link to comment Share on other sites More sharing options...
Jeff4155 Posted November 17, 2014 Share Posted November 17, 2014 Very nice changes, I would have sprayed the inside with the same Phantom colour just to stop it from showing brake dust. I have never seen a rim with so many holes, they really are made too fit any vehicle Quote Link to comment Share on other sites More sharing options...
thomas.wesley Posted November 17, 2014 Author Share Posted November 17, 2014 Very nice changes, I would have sprayed the inside with the same Phantom colour just to stop it from showing brake dust. I have never seen a rim with so many holes, they really are made too fit any vehicle I think keeping the inside of the wheel white makes the Phantom Blue stand out a bit more. If it bugs me that it keeps getting dirty then I will probably spray it a different colour! :) Yeah they fit on a 4x100mm and a 4x114.3mm PCD, pretty nifty! Quote Link to comment Share on other sites More sharing options...
thomas.wesley Posted November 17, 2014 Author Share Posted November 17, 2014 So I woke up this morning and decided the Wheels were dry and cured enough to put them on! And I'm very happy with the result! The next problem was the wheel caps. Too dull and they had red on them, nothing like the freshly painted wheels. Nothing a bit of Phantom Blue paint couldn't fix! I'm going to let them cure a bit more and then put them on The Phantom tomorrow! - Tom 1 Quote Link to comment Share on other sites More sharing options...
thomas.wesley Posted November 20, 2014 Author Share Posted November 20, 2014 Here are the wheel caps on The Phantom! Happy with how my first spray job went! Will definitely be doing some more painting now that I have the setup! - Tom Quote Link to comment Share on other sites More sharing options...
dmizz93 Posted November 20, 2014 Share Posted November 20, 2014 Really like the mods you've done pal! Looks great, must admit I wasn't sure on the white alloys as I had them on my old car and were a b*tch to keep clean but looks really sweet on the 'ol blue you've got going on! 1 Quote Link to comment Share on other sites More sharing options...
thomas.wesley Posted November 20, 2014 Author Share Posted November 20, 2014 Really like the mods you've done pal! Looks great, must admit I wasn't sure on the white alloys as I had them on my old car and were a b*tch to keep clean but looks really sweet on the 'ol blue you've got going on! Yeah I'm hoping that because I did them a gloss white that it will be easier to clean than a matte finish! But fingers crossed! Quote Link to comment Share on other sites More sharing options...
thomas.wesley Posted November 26, 2014 Author Share Posted November 26, 2014 So I ordered some parts from Ford Parts Malaysia today! Hopefully they will arrive some time next week so I show you all how they look! :D Quote Link to comment Share on other sites More sharing options...
thomas.wesley Posted December 29, 2014 Author Share Posted December 29, 2014 So just an update from the last few weeks! I bought a new Key Housing and painted it to match the Phantom :) Think it looks amazing! But unfortunately I had an accident. Wasn't horric but it was enough to ruin my Triple R Composites Splitter. I was travelling at night and the big 4WD Car in front of my hit a Wallaby (Smaller version of a Kangaroo for those who aren't familiar with them) And of course their car killed it and just passed over the top of it with it's high clearance. Unfortunately for my with a car that is much lower and has a Splitter on the front I wasn't so lucky. It ended up being dragged under my car and leaving a big mess there. But this is what happened to my splitter. Cracked and splintered in many places, it ripped the center bolt out of the bumper. Not sure now if it is worth repairing or I should buy a new one... It will cost £145 to get it to Australia, and I'm not sure how much it will cost me to repair. The Phantom has a rattle in the steering wheel or steering column and I'm going to be getting that fixed on the 9th. Bit annoying and I'm not sure why that's happened, but eh! If anybody has had any experience with repairing Fiberglass or had a rattle in their steering wheel please let me know! Cheers! - Tom Quote Link to comment Share on other sites More sharing options...
thomas.wesley Posted January 13, 2015 Author Share Posted January 13, 2015 Okay, so more bad new followed by the good! I was going to respray my wheels black and change them from the white they were.. When I got the tyres removed to do this.. I discovered that 3 of the 4 were twisted and not able to be repaired without spending huge amounts of money... So I just decided to get new ones. Found them online. Then went and bought them! Then I put them on The Phantom to see how they looked! (I also removed my white pin stripes) Next I painted them... Same process as last time so it wasn't documented as much, only this time I took the tyres off! I also saw a Focus ST by Boomba Racing with wheels I liked the look of. So I tried the same thing! Cleaned up the airbrush overspray. Clear Coated and Polished. The Tyres are getting put back on the wheels tomorrow, so I will post pictures of the finished product then! - Tom 1 Quote Link to comment Share on other sites More sharing options...
b4zz Posted January 15, 2015 Share Posted January 15, 2015 liking the wheels fella sorry to hear about the accident with the spliter but im sure you will soon have it sorted out have you any pics of the car front of please as I like what you have done so far Quote Link to comment Share on other sites More sharing options...
thomas.wesley Posted January 17, 2015 Author Share Posted January 17, 2015 Sorry I haven't posted when I said I would, I've been busy working. But here's the update. I won some Smoked Dectane Lights on eBay a few weeks back and they arrived the day that my wheels were to be fitted. Just out of the box. Before Installation. Left side installed. The Difference. Both installed! Next it was time to get the wheels fitted! Before shot! After Shot! Next I gave her a clean and then took a heap of photos. And there are some photos there of the front of the car as requested Barry :) The RS Lip is off at the moment as I am in the process of securing it better thank it was! I appreciate the feedback! Thanks! - Tom Quote Link to comment Share on other sites More sharing options...


Recommended Posts
Ford UK Shop
Sponsored Ad
Name: eBay
Ford Model: FordUK Shop
Ford Year: 2024
Latest Deals
Ford UK Shop for genuine Ford parts & accessoriesDisclaimer: As the club is an eBay Partner, The club may be compensated if you make a purchase via the club
Join the conversation
You can post now and register later. If you have an account, sign in now to post with your account.