StornowayBlue Posted August 22, 2015 Share Posted August 22, 2015 OK, I have a mk 4 Mondeo and have ordered some parts to upgrade to the facelift front-end. One concern I have at this stage is wiring the DRL's. I ordered them on eBay, they don't appear to come with wiring so I'm wondering if someone can help with this directly or lead me to a link where this has been previously discussed.. I have had this car for ages and have never really liked the front-end. I've ordered a facelift bumper, new headlights, fog-lights, drl's, smoked repeaters and titxs grilles. The bumper will need work and sprayed before fitting but its the wiring of the drl's that I'm going to struggle with. I'm also looking out for a 4.5 bonnet that's not got damage if anyone knows of one. Panther black a bonus but respray is an option. edit - headlights which appear to be smoked on ECP website turned out to be same as my original xenons. Returned them then discovered the black bezel lights are a special edition release only available for £493 each from Ford :'( Quote Link to comment Share on other sites More sharing options...
deathpunch Posted August 27, 2015 Share Posted August 27, 2015 I just wired my drls to a spare live in the fuse box,they just come on with the ignition now as I use the auto headlight on,if wired to the sides they would have only worked at night Quote Link to comment Share on other sites More sharing options...
StornowayBlue Posted August 27, 2015 Author Share Posted August 27, 2015 Thanks mate. I managed to source a relay kit for the DRL's on eBay, seems straightforward enough - provided the plugs fit my lamps. As I understand it, even with Auto lights set to on, the DRL's will come on at full power while your lamps are off. Then, with the relay kit on eBay, they dim to half power when headlights are on. Quote Link to comment Share on other sites More sharing options...
deathpunch Posted August 27, 2015 Share Posted August 27, 2015 That's cool then bud glad you sorted it.......I'm a rebel mine don't dim lol Quote Link to comment Share on other sites More sharing options...
StornowayBlue Posted August 29, 2015 Author Share Posted August 29, 2015 Everything arrived for the facelift - bumper and new bonnet are at the bodyshop for paint, car is booked in for Thursday. I split my headlights to paint the bezels. Crumby job, took 2 hours each side but saved the best part of £1000. Should I go satin black or gloss bezels? Quote Link to comment Share on other sites More sharing options...
deathpunch Posted August 29, 2015 Share Posted August 29, 2015 I think gloss personally but up to you bud Quote Link to comment Share on other sites More sharing options...
deathpunch Posted August 29, 2015 Share Posted August 29, 2015 I'm thinking about splitting my headlights too now lol Quote Link to comment Share on other sites More sharing options...
deathpunch Posted August 29, 2015 Share Posted August 29, 2015 I'll tell my Mrs it's your fault :-) Quote Link to comment Share on other sites More sharing options...
StornowayBlue Posted August 29, 2015 Author Share Posted August 29, 2015 Im not sure, the ones I saw look glass, I have both, I think Ill go satin first and if I dont like, just go over again with gloss. Not sure I'll get them watertight ever again but i guess ill find out soon. Buy your Mrs something with the money you save doing it, she'll be sweet ;) Quote Link to comment Share on other sites More sharing options...
deathpunch Posted August 29, 2015 Share Posted August 29, 2015 Lol not a bad idea,mine are already fly eyed so they are dark already Quote Link to comment Share on other sites More sharing options...
deathpunch Posted August 29, 2015 Share Posted August 29, 2015 What colour is your car?? Quote Link to comment Share on other sites More sharing options...
StornowayBlue Posted August 29, 2015 Author Share Posted August 29, 2015 Panther Black Quote Link to comment Share on other sites More sharing options...
deathpunch Posted August 29, 2015 Share Posted August 29, 2015 Yh mine too got any pics?? Quote Link to comment Share on other sites More sharing options...
StornowayBlue Posted August 29, 2015 Author Share Posted August 29, 2015 Its completely standard, 2.5 Titanium X, with ff sunroof, nav and dvd. Seen one, you've seen em all. The cars quite mint, I've had it 6 years now but never really taken with the front end. Its only got 38k so I decided to keep it rather than replace it with something more expensive but ultimately more inferior. I just replaced all the power steering and decided to treat her to a facelift. Hope to look like a 4.5 Tit XS by the time im done. I'll post pics in due course. Quote Link to comment Share on other sites More sharing options...
deathpunch Posted August 29, 2015 Share Posted August 29, 2015 Ok bud I just got the mk4 titan x but it's lowered and has a front splitter it looks mean tho and I have the eyebrows on the lights too,I prefer the 4.5 grills tho Quote Link to comment Share on other sites More sharing options...
StornowayBlue Posted August 31, 2015 Author Share Posted August 31, 2015 Its been a busy weekend. Having baulked at Ford's asking price for blackeye headlights for the mondeo mk4, I took the plunge and split my headlights. Having researched the subject pretty thoroughly, I armed myself with the trusty heat gun and a selection of flat screwdrivers. I even went out and bought a dremel in case things got really bad. The process although tedious wasn't as bad as I had imagined it would be. There are 2 locating pins on each lens that marry with the housing, this makes the job a whole lot trickier when removing but are priceless when it comes to re-assembly. The lamp housing has a c-channel around the perimeter, into which the lens is bonded. I worked my way around the perimeter with the heatgun, working about 10cm at a time and lifting the outer edge of the housing up with a screwdriver. I repeated this until I had the outer lip of the channel up and completely clear of the lens. Then I pried the lens from the housing using heat/screwdrivers taking care around the locating pins and eventually got them apart in around 2 hours for each side. You can see how the channel of the housing below has been lifted up. Bezels just need a light abrasion, I used a piece of scotch pad. The one in the back of this shot is keyed for paint. Painted, wait overnight, zzzzzzzzzz. The painted bezel, screwed back into the lens and dry fitted. While I was waiting for the paint to dry, I cleaned out the old bonding from the housing and cleaned the lens. I chose not to remove the lamps from the housing to avoid any damage and just blew away any debris with a hair-dryer before assembly. After filling the clean channel with a good bead of sealant I located the pins in their sockets and pressed both halves back together firmly. Now would be a good time to have someone assist you. I decided to bind the unit with twine. Starting with a loop over the upper mounting bracket,, wrap the string around as many times as you can. I was alone for this and it was a bit of a mission but managed to keep everything really tight. The shape of the corners doesn't really allow for string so I used copious amounts of insulating tape. There's also little opportunity for clamps but every little helps. Making a mess of this part will leave you with regrets. Vacuum bag would be ideal for this. Close-up of the join. Tabs relocated and the edge held back down in place with string until cured. Patience is a virtue.. Mondeo XR5 OSF Blackeye Headlight - Done NSF. Hope this was useful/interesting. It's a bit of hassle but I think its worth it. The car now goes into the bodyshop on Wed for the 4.5 frontend. Having become a little more familiar with the site, it looks like I might have started this in the wrong forum. If admin would like to move it to the appropriate section, that'd be great. 1 Quote Link to comment Share on other sites More sharing options...
StornowayBlue Posted September 1, 2015 Author Share Posted September 1, 2015 Set back tonight, The body-shop called last thing and postponed tomorrows paint work - gutted. Could be a few weeks away now. Quote Link to comment Share on other sites More sharing options...
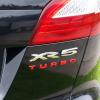
StornowayBlue Posted September 15, 2015 Author Share Posted September 15, 2015 Update, still waiting for the new bumper and bonnet to be painted but I'm hoping it gets done this week. Everything should be plug and play from here on in. I bought a loom from Ford to get a hold of some DRL plugs. For £30 it was the same as a breaker wanted for a used pair of plugs with short tails. I used the kit from eBay to power the lamps. Ignition live from a piggy back fuse and another wire connected to the headlights that dip the DRL's at night. There were other options to connect to indicators and a strobe function but I never bothered with them. I struggled to find which terminal on the headlight plug was for the indicator and the Haynes manual doesn't seem to cover it either. I also gave her a new air filter, remap and new badges since my last post. The letter X had come off the boot a while back so I removed the Titanium letters and replaced with XR5 turbo. I'm now keen to fit the black gloss lower honeycomb diffuser as fitted to the facelift titx sport. Can anyone say one way or the other if that will fit onto a mk4 titx bumper? Quote Link to comment Share on other sites More sharing options...
StornowayBlue Posted September 19, 2015 Author Share Posted September 19, 2015 Thought I'd add a picture of the original DRL connector plug as fitted to facelift Mondeo's. Searched everywhere for this and couldn't find much about it online. I had to get a hold of an original loom and cut the plugs off. There are 3 wires on the original loom but only 2 on my retro relay wiring kit from eBay. I connected each wire to the battery and found that one wire only emitted half the brightness. Just soldered to the wires from my kit and insulated. Bad news from the body-shop this week, they opened the new bonnet to find it damaged. I'm waiting on a replacement coming so more delays to front-end. I satisfied my impatience a little by fitting a new boot spoiler today. Quote Link to comment Share on other sites More sharing options...
StornowayBlue Posted September 29, 2015 Author Share Posted September 29, 2015 Bonnet supplier and courier are now saying tough luck on the damaged bonnet - Gutted! Looks like I'll need to Shell out for another bonnet. In the meantime, I managed to get a hold of a gloss black diffuser for the car but I'm struggling with the Ecat part numbers. Its listed as 1726319 and appears to fit all bumpers but I'm not sure. It certainly doesn't fit mine as I have the matt black trim that goes wheel arch to wheel arch if you like. I had hoped it would fit the lower spoiler off a TXS but have been told the diffuser on the TXS is part of spoiler and cant be removed/replaced. Can anyone tell me if I need a new bumper, new rear lower spoiler or what exactly in order to fit the new diffuser? Thanks in advance. Quote Link to comment Share on other sites More sharing options...
jeebowhite Posted September 30, 2015 Share Posted September 30, 2015 most of your images have expired :( if this is your project thread, I could move it to the right section? Quote Link to comment Share on other sites More sharing options...
StornowayBlue Posted September 30, 2015 Author Share Posted September 30, 2015 Thanks jeebowhite, if you could would be great. Quote Link to comment Share on other sites More sharing options...
StornowayBlue Posted December 13, 2015 Author Share Posted December 13, 2015 Finally managed to get a slot in the bodyshop to get the 4.5 bumpers and bonnet painted. All came out pretty good. Lamps look really yellow now with the DRL's though. Quote Link to comment Share on other sites More sharing options...
BenMurphy43 Posted December 29, 2015 Share Posted December 29, 2015 Lovely work, if you're looking at white bulbs for your headlights do not purchase 100 watt bulbs they'll more than likely melt your housing 2 Quote Link to comment Share on other sites More sharing options...
jeebowhite Posted December 29, 2015 Share Posted December 29, 2015 Buy yourself a set of xenon from a later titanium x or something Sent from my GT-I9195 using Tapatalk Quote Link to comment Share on other sites More sharing options...


.thumb.png.327e57655a9a82472089ef077ae02c11.png)


Recommended Posts
Ford UK Shop
Sponsored Ad
Name: eBay
Ford Model: FordUK Shop
Ford Year: 2024
Latest Deals
Ford UK Shop for genuine Ford parts & accessoriesDisclaimer: As the club is an eBay Partner, The club may be compensated if you make a purchase via the club
Join the conversation
You can post now and register later. If you have an account, sign in now to post with your account.