zain611 Posted May 12, 2018 Author Share Posted May 12, 2018 Pictures of the removed bolt Quote Link to comment Share on other sites More sharing options...
zain611 Posted May 13, 2018 Author Share Posted May 13, 2018 So today cleaned up the splash shields, calipers and carriers and sprayed them gloss black. Looks a lot better. Hopefully the glossiness lasts. Used a wire attachment on an angle grinder to clean up the hubs, shields and calipers and carriers. After cleaning the hub Cleaning the shields First and second coat of gloss black heat resistant paint on the carriers Before and after doing the calipers. And doing the splash shields Calipers and carriers Quote Link to comment Share on other sites More sharing options...
zain611 Posted May 14, 2018 Author Share Posted May 14, 2018 Next day after it still looks shiny Quote Link to comment Share on other sites More sharing options...
zain611 Posted May 14, 2018 Author Share Posted May 14, 2018 Splash shields 24 hours after spraying them. Quote Link to comment Share on other sites More sharing options...
b4zz Posted May 15, 2018 Share Posted May 15, 2018 looking good fella 1 Quote Link to comment Share on other sites More sharing options...
zain611 Posted May 15, 2018 Author Share Posted May 15, 2018 4 hours ago, b4zz said: looking good fella Thanks b4zz, what happened with your headlight eyebrows? Quote Link to comment Share on other sites More sharing options...
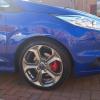
zain611 Posted May 17, 2018 Author Share Posted May 17, 2018 Today's cleaning pictures. Recently got bilt hamber auto wheels and that looked to help clean the wheels however you would still need to remove some remaining dirt by hand Quote Link to comment Share on other sites More sharing options...
b4zz Posted May 18, 2018 Share Posted May 18, 2018 On 5/15/2018 at 12:39 PM, zain611 said: Thanks b4zz, what happened with your headlight eyebrows? not to sure as when I used the lights at night some of the beam pattern was lost so not sure if it was the light brows or the head lights are missalinged. might have to have another look at them at some point Quote Link to comment Share on other sites More sharing options...
zain611 Posted May 18, 2018 Author Share Posted May 18, 2018 3 hours ago, b4zz said: not to sure as when I used the lights at night some of the beam pattern was lost so not sure if it was the light brows or the head lights are missalinged. might have to have another look at them at some point Check you headlight alignment. If there are alright then it must of been the eyebrows. I'd say not to install the eyebrows if it is blocking some of the light. Also you can't lower the beam pattern as the light would just shine on the ground and not at a distance 👍 Quote Link to comment Share on other sites More sharing options...
zain611 Posted May 18, 2018 Author Share Posted May 18, 2018 Did some more cleaning. Cleaned up and sealed the door sills and cleaned the seats. Quote Link to comment Share on other sites More sharing options...
b4zz Posted May 19, 2018 Share Posted May 19, 2018 20 hours ago, zain611 said: Check you headlight alignment. If there are alright then it must of been the eyebrows. I'd say not to install the eyebrows if it is blocking some of the light. Also you can't lower the beam pattern as the light would just shine on the ground and not at a distance 👍 will do that at some point mate and have put my spare lights back on at the moment until I have some spare time to check the alignment 1 Quote Link to comment Share on other sites More sharing options...
zain611 Posted May 26, 2018 Author Share Posted May 26, 2018 (edited) Added a layer of lacquer on the calipers and carriers. Looks a little more shiny Sadly a little bit of the layer bubbled / crazed 😢. Hopefully won't be noticeable on the car. Update - so sanded down the crazing of that bit on the above picture. Sprayed it again with the lacquer but it began to craze again. Looked at the paint can that was used to add the black paint and just noticed it said to not combine it with other paints / lacquers so possibly the base coat might have reacted with the lacquer. Tomorrow may just sand it again and just apply the black paint and leave it from there. Edited May 26, 2018 by zain611 Update to the crazing paint 1 Quote Link to comment Share on other sites More sharing options...
zain611 Posted May 27, 2018 Author Share Posted May 27, 2018 Sanded down the face of the caliper again and sprayed it with the black paint (not lacquer) looks better but not perfect. When the front calipers get sprayed I might just use the gloss black paint not the lacquer. Quote Link to comment Share on other sites More sharing options...
Jonro2009 Posted June 1, 2018 Share Posted June 1, 2018 You need to get onto those plastic rubbing strips down the side of the car, it scrubs up so well but they let it down a little. The difference a good wash has made is awesome, sort the strips out and it wouldn’t look out of place on a stand mate.Sent from my iPad using Tapatalk 1 Quote Link to comment Share on other sites More sharing options...
zain611 Posted June 2, 2018 Author Share Posted June 2, 2018 16 hours ago, Jonro2009 said: You need to get onto those plastic rubbing strips down the side of the car, it scrubs up so well but they let it down a little. The difference a good wash has made is awesome, sort the strips out and it wouldn’t look out of place on a stand mate. Sent from my iPad using Tapatalk Definitely am thinking of getting them sprayed 👍. Doing the rear drums to ST discs conversion at the moment so hopefully in the evening will show the results ☺️ 1 Quote Link to comment Share on other sites More sharing options...
Jonro2009 Posted June 2, 2018 Share Posted June 2, 2018 I’ll keep my eyes peeled thenSent from my iPad using Tapatalk 1 Quote Link to comment Share on other sites More sharing options...
zain611 Posted June 2, 2018 Author Share Posted June 2, 2018 Alright so finally got around to doing the rear drums to ST discs conversion on the car. Drums which were on the car Stuff which were needed for the conversion all placed and ready Replaced the handbrake cable to a new one which goes to the calipers. Removed the drums from the car Before and after cleaning these bits with an angle grinder to smooth them up Finally added the hub and splash shields Carriers then pads added Then finally finished off with the gloss black calipers. Really do like the colour and looked really cool once on. Finishing pictures. Attached the new brake hoses and handbrake cable to the calipers before bleeding the brakes. Looks as good as new. Before and after Really happy on the way it's come out and looks. Hopefully tomorrow will install the ST pedals and plan when to spray the front calipers. The rear brake set up looks as if they were new Quote Link to comment Share on other sites More sharing options...
Jonro2009 Posted June 3, 2018 Share Posted June 3, 2018 Nice job @zain611 I’ll bet that took the best part of a day! How did your insurance company view that mod, did they look at it favourably because it increased safety? Don’t forget to keep all your receipts (and this thread) to show to the next owner! Looking good, all your hard work is paying off 1 Quote Link to comment Share on other sites More sharing options...
zain611 Posted June 3, 2018 Author Share Posted June 3, 2018 17 hours ago, Jonro2009 said: Nice job @zain611 I’ll bet that took the best part of a day! How did your insurance company view that mod, did they look at it favourably because it increased safety? Don’t forget to keep all your receipts (and this thread) to show to the next owner! Looking good, all your hard work is paying off Thanks Jonro, lol it took about 6 hours to get it done. Start at around 4 and finished at around 10pm. I'm with admiral at the moment and can't really say they they consider mods as safety lol but they did say something about it being good that the parts are from Ford and not custom made. My insurance renewal is next month so want to call modified insurance specialists like sky insurance and adrian flux to see how much they'll quote me. I was just doing quotes saying I've held my licence for 3 years and have 3 years Ncb (have 2 years at the moment until my renewal) and the quotes went down a lot so possibly I'm out of that 'inexperienced' period. Also forgot to mention there's no receipts for the beam but do have some for the new handbrake cables, hoses and discs. Sadly I might have to keep the car for another 3 years due to the ultra low emission zones coming to London in 2022. I'd have to pay £12 a day for driving my car. Diesels made after around 2016 are free to drive and petrols made after around 2005 are good. Quote Link to comment Share on other sites More sharing options...
zain611 Posted June 3, 2018 Author Share Posted June 3, 2018 Installed the ST pedals. Before and after pictures. Does look smarter. Need to get pictures when the car is outside the garage. Outside picture Quote Link to comment Share on other sites More sharing options...
zain611 Posted June 3, 2018 Author Share Posted June 3, 2018 Did some local driving and can see the pads bedding in and going shining. To give my view the braking does feel better. Feels like I have to put less pressure on the brake pedal for it to brake. The drums I had before had to be adjusted and it was adjusted at one point but it felt like it needed adjusting again after about 4 months and that's after about 1500 miles. Can't remember if braking felt good like this after I had the drums adjusted but definitely feels better. Also forgot the handbrake is much better. Put it up on one click and I had to rev the car a bit say around 2k revs for it to slowly move forward. Before with the drums it was like this but began to had to put the handbrake up higher after a few months. Pros: Better braking Don't need adjustment like I said before. My drums needed adjustment after a few months and that's with little mileage. Possibly better in terms of maintenance? Don't need to constantly check them like drums. Cons: Only thing I'd not like personally is brake dust and that will make the wheels dirty. With the drums I'd notice the rear wheels would stay cleaner than the fronts. Maintenance cost? Costs for pads and discs compared to drum shoes. Quote Link to comment Share on other sites More sharing options...
zain611 Posted June 13, 2018 Author Share Posted June 13, 2018 Did a proper detail on the car. Took a good 3 whole days to do it. Firstly cleaned the car and decontaminated it from the fallout. clay bar'd it Then inspected the paint. It was covered in light scratches and swirl marks. Tried out the menzerna medium cut polish on the roof. Before and after. Took off 99% of the scratches. Then used the Koch chemie H8.02 compound on the bonnet made a difference and brought back the colour. Before 50 / 50 After Before and after compounding the bumper Polished the tail lights and looks a lot better now. Before and after. Extra pictures Applied britemax blackmax which added just a touch more darkness to the paint. Then added fusso coat and petes 53 wax. Dont add too much wax like me overwise it will be a pain to remove. Finishing pictures after 3 hard days work 1 Quote Link to comment Share on other sites More sharing options...
zain611 Posted June 14, 2018 Author Share Posted June 14, 2018 The sun eventually came out and got a picture of the bonnet. No scratches and looks like new. Quote Link to comment Share on other sites More sharing options...
b4zz Posted June 15, 2018 Share Posted June 15, 2018 loving the rear disc brakes looks so much better. great job on the detail you done 1 Quote Link to comment Share on other sites More sharing options...
zain611 Posted June 19, 2018 Author Share Posted June 19, 2018 Bought insta finish trim magic, made a big difference on the faded plastics. Found this to be a pain to use. You'd have to mask around the trims as this can harden up. There's an inner cap in the bottle which I'm not sure is there as an inner seal or used as a cap to drip out the product. It came off and was hard to put it in so had to hold the applicator pad on top of the bottle and tip it quickly. This made it risky as I accidentally dropped some on the floor. Besides from that here's a picture of one side of the door handle. This had some of the product on it which the guys at slim's put on to show me. You can see it looks faded This is the other handle which I properly applied the product on Before After The door handles and trim which hides behind the windscreen wipers came out darker. Will last about a year or two. The stuff which fell on the worktop went rock hard and I needed a finger nail or flat head screwdriver to take it off so that shows how hard and durable this stuff is. Front trim looks more shiny Overall its hard for me to recommend it. It claims to last a long time but the experience I had on messing about with the bottle and applicator pad makes me think to get a water based dressing and not worry about masking anything. I have just over half a bottle left and that's after dropping the bottle on the floor and wasting some from tipping it on the applicator pad. If the inner seal didn't come off it would make it a lot easier to apply as it would drip out besides from pour out. Quote Link to comment Share on other sites More sharing options...


Recommended Posts
Ford UK Shop
Sponsored Ad
Name: eBay
Ford Model: FordUK Shop
Ford Year: 2024
Latest Deals
Ford UK Shop for genuine Ford parts & accessoriesDisclaimer: As the club is an eBay Partner, The club may be compensated if you make a purchase via the club
Join the conversation
You can post now and register later. If you have an account, sign in now to post with your account.