
Leaderboard


Popular Content
Showing content with the highest reputation on 03/30/2017 in all areas
-
Painting brake calipers adds 5bhp too. I done the driver's side on a Saturday and the car kept pulling towards the right until I done the passenger side the following Sunday morning.3 points
-
The spoiler another 5bhp, oh you can upgrade your interior lights to white leds Sent from my HTC 10 using Tapatalk3 points
-
...Well not exactly new. Got my 2014 focus titanium few hours ago and still finding my way through the settings, 3 questions from a newbie with all the new gadgets in car...new for me anyway. 1: Stop/Start which seems to do what its supposed to do (once warmed up) but rev counter does not drop to zero, it remains about idling speed revs, is this normal? 2: does the tit 1.0L ecoboost come with alarm as standard? I'm not sure if this has a alarm, doesn't chirp as you lock the car although indicators flash twice when locking. Any way to check if it is alarmed without breaking a window :-) 3: Sony Dab radio works fine, Can I stream music via Spotify on my Iphone to the car speakers?2 points
-
I have just bought a mk2 06 focus 1.6 petrol and I'm gonna use it as a project, but I can't find any good sites that are relatively cheap for mods. Engine, suspension, wheels etc. Help please2 points
-
Is that 5 per Caliper Lenny? Surely Red adds 10?2 points
-
Don't forget dropping it too 👍🏼2 points
-
Best MOD: - Xtron Android kit - K&N air filter not induction square air filter. - Change cambelt and water pump.Easily 2bhp extra speakers. - ST style alloy wheels - Tints if needs must. Enjoy. Sent from my HTC 10 using Tapatalk2 points
-
Get at style alloys Sent from my HTC 10 using Tapatalk2 points
-
Get them from Autobeam when I had one go faulty they replaced it straight away, 2 year warranty and look amazing.2 points
-
Are you fishing for a card? [emoji6] Sent from my iPad using Tapatalk2 points
-
dont make me laugh them BMW's / mercs have double maybe triple your BHP but decide not to kill people unlike yourself you by no means a racecar driver, even they crash. its not balls its common sense to want to see your next birthday which is next thursday for me.2 points
-
Your little 125 will burn off most things because they aren't trying to race you, they have the restraint not to put people's lives in danger. If I saw you driving at double the speed limit in a 30 I would be the little spec in your mirror reporting you! I'd like to think you are just trolling, and bigging yourself up like a lot of the keyboard warriors. I'd rather hear a bean can exhaust and loud BOV trundling past than see people like you go past in a blur. Sent from my iPad using Tapatalk2 points
-
Hi, The wife's CMax started playing up the other day. I knew for a while that she couldn't open the boot using the switch, only the remote button could unlock the boot. No big deal, so we left it. However, a couple of days ago, the boot started opening at random times, mainly when the car was started. It quickly progressed to opening whilst driving or sticking it into reverse. I had a look on here and the internet. It looked like I might have to shell out a few quid for a new switch. I read that recently someone had used a small button switch from a mouse, so I thought I'd have a go at that before giving my hard earned cash to the people who designed the car badly in the first place!! Tools required.... Hex bit for screws in grab handles 10mm spanner (ratchet spanner preferred) Soldering iron and solder An old computer mouse Superglue Silicon sealant. This is what I did; I removed the 2 screws in the grab handles at the bottom of the bootlid cowl. Then I gently prised the cowl off the bootlid. This was surprisingly easy to do and none of the clips or plastic broke. I then loosened the 4 nuts that hold the outer plastic trim using the 10mm spanner (where the boot switch is located) onto the boot. I prised this away from the bootlid and pushed in the grey plastic clips on the side of the switch mechanism which released it. I then unplugged the switch from the loom and removed it from the car (along with the grommet). (You can see I had 3 switches lined up to see which fitted best, 2 were from the mouse and one was from an old led bike light) I peeled back the rubber 'gaitor' from the switch and found the same white powdery stuff that others have found, which meant that water ingress was probably to blame. I gave this a good clean and had a play with the switch to see if it still worked. The multimeter told me it was intermittently faulty. I removed the original seal where the wires join the switch and pushed the switch out from the bottom of the plastic trim. I found an old mouse and butchered it. I got out my old soldering iron and removed a couple of hopeful switches, stabbing myself in the palm in the process. I am a rubbish solderer, so if I can manage it, everybody else can!! I cleaned up the plastic trim and dried it thoroughly. I then de-soldered the original switch. I fed the wires back through the little gap and soldered the new switch on. Took me half an hour because I'm terrible at it. A couple of burns later and it was done. I had some strong superglue lying round, so I used that to fix the new switch in place, making sure it lined up with the button in the trim. I didn't have any clear silicon sealant so some white anti-mould shower sealant had to do the job. I plugged up the hole by the wires thoroughly with the sealant and made sure it was neat inside the trim. Next up was putting the rubber trim back in place. Some careful application of the sealant later, and the whole switch was watertight (hopefully). I put it all back together and for the first time in a couple of years the boot opens using the switch. The random problem of it opening seems to have stopped as well. It's early days but looks promising. Only took an hour or so and didn't cost me a penny either!! This seems to be a common problem with CMAX's and Focus' between 04 and 07. I've put this in a couple of places as well to help as many people with this problem as possible.1 point
-
hi, I found this forum having been faced with the same question - rear parking sensors on a Fiesta mk7... two hours later and having successfully fitted a working set of £15 sensors from Ebay, I can confidently give some tips and advice 1. Most responses I found on google suggested the need to remove the bumpers. Having no manual in my possession, and faced with a plethora of screws and bolts in weird places, I was averse to doing this on my shiny new car... After a bit of head scratching I realised this was not necessary. 2. The kit comes with a drill bit for cutting the holes in the bumper. I realised that once I had cut the holes, the sensors merely plugged through these holes and the wires dangled down inside the bumper. Lying down under the car, you can wiggle the wires until you can get hold of them. 3. Regards position of sensors, I found this picture as a guide. Tip: don't use permanent marker pens on bumpers, white spirit does not remove it... Regards the drilling, yes scary drilling into your lovely new bumpers, but rest assured the drill bit leaves a very clean hole and the sensors plug in perfectly looking very professional. 4. Inside the boot, pull up the side carpeting to reveal a rubber grommet on each side of the boot floor - handy for pushing the wires through. Push a knife through to make a small hole, then feed the wires from each sensor through these grommets, two on each side. Fiddly, and you get a bit wet in the rain, but you now have nicely fitted sensors with wires neatly found in the boot. 5. Ok trickiest bit - connecting the power wires to the reversing light wires. Again I worried I had to remove the rear lamp cluster to do this. But no, all you have to do is prize off the carpet over the rear light cluster on the passenger side, then look inside where you'll see the wiring plug going into the back of the light cluster. This just pulls out - I say just, but course without being told that I was fearful of breaking it, so I prized it out carefully with a screwdriver. Once out I was able to confirm it just pulls out over a small click. 6. Hardest bit - joining the wires. You now have five wires going into the plug, and a black and a red wire you want to attach from the sensor unit - which two wires do you connect ? Memories of James Bond films spring to mind... An hour of googling gave no joy, and the fact that the Fiesta wires were all duel coloured didn't help. So, I put the car in ignition (not engine running), engaged reverse on the gear box, then pushed the black wire into one of the five holes and tried the red wire in the four remaining holes. If no sound you then move the black wire to another hole and repeat. Eventually the buzzer buzzed and I'd worked out the two correct wires. At this point I should have noted the colours for you. Sorry, I forgot and they're all packed neatly away now so you'll have to follow my handy method... All I can remember is that there were three holes above two holes. The black went into the top middle, the red into the top right - I think... 7. Once you identified the wires, you don't have to cut the Fiesta ones. Merely use a sharp knife to scrape away a section in the middle of the wire to expose the wire itself. Then wrap the sensor wire around the exposed area tightly and wrap it in black plastic insulating tape found in your kitchen drawer. Check you have a clean connection by engaging reverse gear and standing in front of the sensors to get the continuous beep. 8. Once happy it all works, push the lighting plug back in, stick the sensor units to the car body wall just under the carpet, stick the buzzer on the other side, tuck all the wires under the carper and tuck the carpet back in neatly. There you go - job done. Cost £15. Took me an hour and a half with head scratching - with my learnings above you should be able to do it in under an hour. For those who doubt the quality of a £15 set off Ebay - all I can say is that I bought a similar set for my Mitsubishi two years ago and they've been working perfectly ever since. Good luck, feel free to ask me any questions...1 point
-
Hi, i have a 2003 1.4 tdci fusion in which needs a new alternator. Howevet I don't know which to get, Haynes book says that it's either 70,80,90 amps but not which one for what car. Can I use any? Also it says there are about 3/4 different makes.... any better than others. Forgot to say I need to buy it second hand / used so eBay will be prob the place for me.... any help appreciated. Thanks Joe1 point
-
Hey guys (n gals) Matt ere from Mansfield in Nottingham, driving an 09 plate Focus 1.6 TDCI. Had it a couple of years now and I am starting to show it some love so thought I would find a pukka forum to make my new home and having had a look, this appears da place to be :) Looking forward to learning some new things and hopefully sharing some knowledge too, once I get some that is lol. Thanks for having me.1 point
-
Nice find Danny thanks, I'll try that in the morning.1 point
-
Take a look at Lenny's tutorial they are really good1 point
-
Other mods ST seats / led rear lights / wind deflectors / ST rear spoiler1 point
-
Talking of radio stations I absolutely love Brain Gell radio. Pure metal 24/71 point
-
I will be making a tutorial on how to do this is if everything goes successful! And the 2 users who have helped me so far will be given credit for all there help! I am currently using this thread to upload images whilst on the way to completing the mod.1 point
-
Sweet he's out of stock on the 20's but will order up when available :)1 point
-
That is random! Never heard of them snapping when the car is stationary, but it is the best time for them to go as opposed to whilst driving.1 point
-
The 1.6 engine can't really be modified unless you change the cams which gives a whole 15bhp increase to the engine; no that's not a type error that is 15bhp 😕 best saving for a turbo vehicle there much easier to modify using a bleed valve. Check out these websites http://www.european-parts.net/ http://www.pumaspeed.co.uk/ http://www.fordpartsuk.com/ http://www.triplercomposites.com/ https://de.csr-shop.info/public/catalog_xmlxslproductsearch.aspx?qs=ford+focus&art=SetSearch&suid=315&zid=89a1ab11-6d83-405f-a937-0ad262845bac and here's my list of guides: https://www.google.ie/url?sa=t&source=web&rct=j&url=http://www.fordownersclub.com/forums/topic/68214-full-list-lennys-guides/&ved=0ahUKEwjCk-OF1v7SAhViCcAKHRUnD48QFggcMAA&usg=AFQjCNF_jUzFEqw5X3E-vCcv_8WqIoSgew You may also like to watch every episode of these guys too 👍1 point
-
I do like Smooth radio. One station that plays almost no modern music!!1 point
-
So I've stuck my head down into the foot well and I can see some sort of cable hanging to the left of the clutch pedal. Its got two metal contacts on it and a cable at the other side disappearing into the car. I presume its not meant to be there. I can't see to see where it goes, but it looks broken. I have the receipt for the service, it says they have replaced oil, spark plugs, pollen filter, cabin filter and done a lot of checks.
 1 point
 -
1 point
-
Hi take a look in the modifications or tutorial sections plenty of advice to be had1 point
-
I use the light up kind Sorry couldn't help myself1 point
-
thanks a lot sonic for taking time to do that for me and thank stef for your input1 point
-
Can't tell if you're trolling or if you are genuinely being serious...1 point
-
My last 3 pairs of boots were Salomon. My latest pair have done 16 months so far and still going strong. I used to use Merrell but they changed the toecap shape and became uncomfortable. Sent from my SM-G930F1 point
-
Yes it would be the same for me. The DAB+ vs HD isn't quite fair - a lot of digital radios, in car and elsewhere use the same DAB chipsets. A lot of these support DAB+ but often need a software upgrade. We can guess the chances of that :P1 point
-
kpg - do you know if the stock ST alloys have the room behind them for the hub studs to still fit ok? yours looks good but different alloys to mine1 point
-
1 point
-
That bolt looks as if it's tight. Soak it before hand with WD40 or equivalent and only use a 6 point socket with a breaker bar. See here for why a six point socket is better. A 12-point socket is fine for most lightweight repairs, but heavy wrenching calls for a six-point socket. A six-point socket is much less likely to slip off a stubborn fastener or round over the corners. Here's why: (1) Six-point sockets have thicker walls, so they're less likely to flex. (2) A six-point socket is designed to contact the head of a fastener well away from the corners so contact is made on the thickest part of the socket and the flattest part of the fastener. This dramatically reduces the likelihood of slippage and rounding over the corners. And (3), the edges of a socket are angled back a few degrees to allow the socket to slide easily over a fastener. The angle is less on a six-point socket than on its 12-point counterpart, again providing more contact area inside the socket.1 point
-
Not boots, but the brand in general, yes absolutely! I swear by them now. I've had two pairs of walking shoes from them. My last pair were so good (lasted me since summer of 2014, and countless miles), so I went out and bought another pair during the 2016 winter sales. Absolutely chuffed with them - the first one was like walking on pillows, and the second one isn't quite up there, but are still very comfortable (8/10), and also much better looking than the first. Both are extremely lightweight. Also, both were/are of the "Quicklace" type - i.e. they don't have conventional shoelaces, which I love about it. Kinda like Ford's heated windscreens, saves you a lot of time I would assume their boots must be of the same quality.1 point
-
Start up your own show on BBC 😅 talk to Clive and masher ow you will need a big dog called masher 😉1 point
-
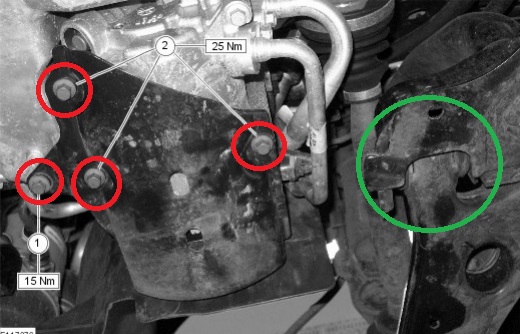
Hi Jason Thanks for the pics. Yes like stefan has suggested just swing the compressor out of way to get at that bolt. I have included a pic here to which shows the bolts you need to remove to get the compressor moved to give you a little room for the Arms bolt. Take of the under shield to get better access to all. The part I circled in green is the bolt you need access to. The parts I circled in red are the bolts you need to remove of the compressor side. I think this is the correct setup judging from your pics. Just take of the under-shield to get access and remove the bolts in red and then shimmy the compressor out of way to get room to the Arm bolt. From there fit the arm as you did teh other side and the build back up the bolts on the compressor and that should be it. Hope this helps. Sonic
1 point
-
I would just drop the compressor off its bracket and swing it and the pipework out the way.1 point
-
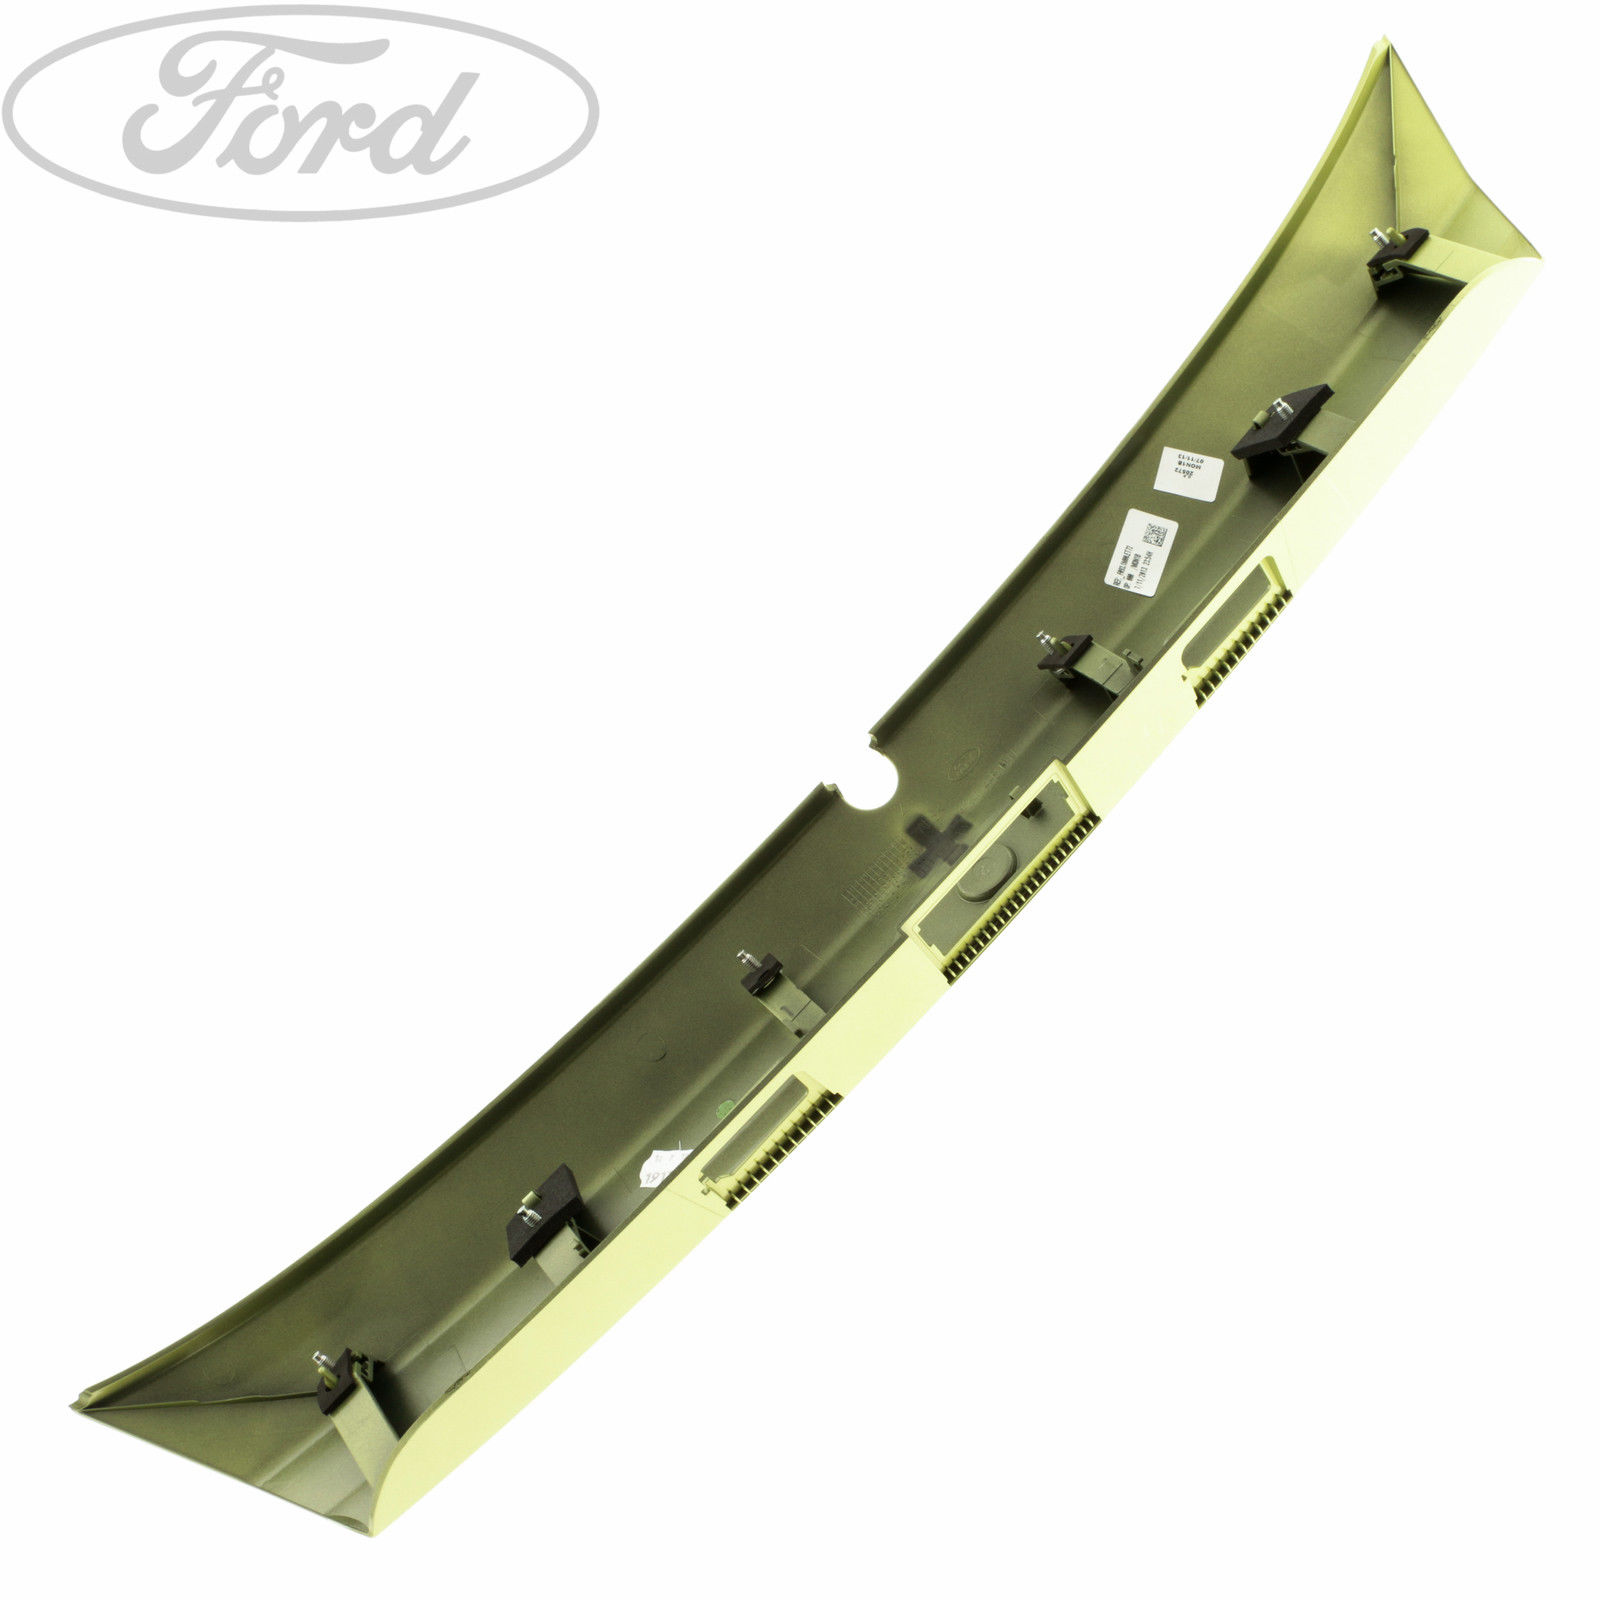
Not true The tailgate panel is accessible by removing the inner boot trim and the cover can then be removed by removing the six nuts. Can be purchased on their own but are pretty expensive brand new and will have to be painted. A whole second hand hatch could cause you many heart aches!.... Any damages not shown in pics -Scratches - Wiper & electrics all removed. How the part has been stored! Damage to the paint on the edges of the lower & upper parts, See so many parts stacked together and on concrete, not good at all. If you do spot a whole hatch in the blue colour, ask the seller if you can buy just the panel and not the whole hatch ? Or if you have to buy a whole hatch, then buy it and remove the panel and re-fit it into your hatch, this will save you loads of hassle in removing the original and messing about re-aligning it and getting it to shut properly.
1 point
-
Just in case anyone's still interested in fixing this for the cheapest method possible, here's the microswitch you need: http://www.maplin.co.uk/p/sub-miniature-lever-microswitch-gw67x This fits perfectly in the plastic housing of the release switch for my 2005 Focus C-Max - really snug, so didn't even need any glue. This particular microswitch is the metal 'level' type. I aligned the metal plunger pin of Ford switch with the end of the microswitch's level. It was just a case of pushing the microswitch far enough into the plastic housing, such that it's not possible for the metal plunger pin to overstress the microswitch. In you're not aware, you need to solder the two black cables to the middle and end (common) contacts on the microswitch. You might need a continuity meter to find out which end is the 'common' contact. I just need to get some proper electrical sealant to protect the wires. Rather annoyingly, when purchasing the microswitch, I ask for something to seal it. The only sealant Maplins could sell me was bathroom silicon sealant ! I asked them if they have liquid electrical tape, and they'd never heard of it ! I guess that sums up what Maplins is becoming ;) Oh, I should also point out that for a measly £11, you can now replace the entire switch. To be honest, I think this is worth paying for, especially as you don't need to faff around trying to seal up your original switch. I wish I'd seen these on eBay before doing it the hard way. http://www.ebay.co.uk/itm/FORD-CMAX-TAILGATE-BOOT-RELEASE-SWITCH-CONTACT-HANDLE-LATCH-1346324-C-MAX-/2721378374761 point
-
The HID setting is only suitable for original HID headlights. Original HID headlights are controlled by the HCM (Headlamp Control module). Activating this option on a car without a HCM will result in several DTC codes. Alternative HID is perfectly suitable for Aftermarket HID headlights. This option was originally intended for original HID headlights without automatic or manual electric leveling which are available in some Northern/Southern American markets. This setting deactivates the bulb check system and supplies the HID ballasts with a steady 12 Volt supply instead of the PWM signal that is used for normal Halogen bulbs. This setting will work for 90% of all aftermarket HID kits.1 point
-
auto locking is available to switch on, but only using foccus software, your ford dealer cannot switch it on.1 point
-
An excellent guide, I will pin this appropriately. I will have a word with the other mod's and see if we should have a CMAX "Guides" section, or wether we shall move it to the general "guides" section...1 point
-
Having read this thread I decided to try and change my own switch. Not wanting to attempt repairing or soldering I took the decision to buy a new one. I bought a genuine Ford part from a main dealer for £12, much less than I had been led to believe on here. In fact I looked on ebay first and they all wanted £30+ Changed the switch in less that 30 mins1 point


.thumb.jpg.50f5b8e141ff7bd16447b7cd27cbd908.jpg)


-
Popular Contributors
-
1
 unofix
88 -
2
 TomsFocus
71 -
3
 StephenFord
53 -
4
 iantt
iantt
40 -
5
 DaveT70
20 -
6
 Eric Bloodaxe
16 -
7
 alexp999
11 -
8
 RayC333
9 -
9
 Turvey
9 -
10
 mjt
mjt
7 -
11
 froggy8
6 -
12
 ssmith93
5 -
13
 Dark Andy
5 -
14
 Alan G H
4 -
15
 Jimpster
4 -
16
 lphuk
lphuk
4 -
17
 Paulkp
4 -
18
 Dan62
Dan62
4 -
19
 tazzman600
3 -
20
 Simmo80
3 -
21
 simonb65
3 -
22
 vitalgs3710
3 -
23
 Tizer
Tizer
3 -
24
 D3rks
D3rks
3 -
25
 MJNewton
3
-


