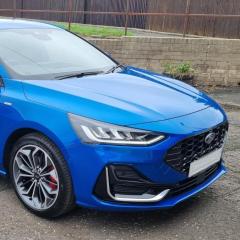
Acid House 1988 Posted September 14, 2021 Share Posted September 14, 2021 So here it is, the start point for my little project... my Ford Focus 1.0L Ecoboost in impact blue. It’s a decent car, in pretty good condition inside and out but certainly in need of some TLC and some essential modifications. I have a project list of course, but I’ll be starting by getting the car looking good as it it is, inside and out so that means it’s going to get a serious clean before I really get going. While this is going on I’ll be looking to source parts for jobs later on in the project and then sort those tasks as and when time & money permits. High on the priority list is sealing those rear vents that the “boot leak” fault is plaguing so many people with, will be trying and get this done in the next few weeks before the weather takes a turn for the worse... colinmcg71 1 Quote Link to comment Share on other sites More sharing options...
Acid House 1988 Posted September 14, 2021 Author Share Posted September 14, 2021 Already managed to source a few of the Zetec S body kit parts in the last week or so,and here's the first one just arrived, the N/S side skirt which has now been cleaned up and prepped ready for passing over to the body shop guys to paint and fit when I'm ready. It's in reasonable condition overall but a few of the obligatory speed bump gauges towards each end, nothing that with be seen and nothing the body shop can't smooth out prior to painting... Quote Link to comment Share on other sites More sharing options...
Acid House 1988 Posted October 4, 2021 Author Share Posted October 4, 2021 So... after a couple of frustrating weeks where nothing got done due to bad weather I finally got to start properly on a few mods. The last few weeks haven’t been wasted though, I’ve managed to source the complete Zetec S bodykit and a few other bits and bobs so they are now all ready to go. The lower front bumper / valance is now in the body shop being prepped and painted ready to be fitted. First job is a set of Autobeam LED sequential indicators and as I’m going for a “dechromed” look I’ve got the smoked/black version. The following photos were taken through the fitting process and I’ve added some notes that might be of interest to people... 1. prep and dismantle - relatively straightforward though a trim kit is useful to get the mirror cover off. Remove the mirror first by using the mechansim to turn the mirror "away"from the vehicle. this leave a gap to get your fingers in and prise the mirror off. When it disengages turn it round and pop it on the housing while the wire is still connected. then you can remove the mirror cover. It's worth putting a towel on the floor in case the cover pings off, might save a bit of unwanted damage. Before you do this, look inside the mirror housing, there are two locator clips on the inside of the mirror, these need to be prised down before the cover will come off. Lift out at 45 degrees so the lower clips disengage... Quote Link to comment Share on other sites More sharing options...
Acid House 1988 Posted October 4, 2021 Author Share Posted October 4, 2021 Handy tip when installing the new units... these come with a switch to toggle between sequential and flashing mode - as I'm leaving them in sequential mode I thought it would be a good idea to wrap the switch in insulation tape to prevent any possible water ingress... these can then be tucked in behind the mirror motor mechanism... Quote Link to comment Share on other sites More sharing options...
Acid House 1988 Posted October 4, 2021 Author Share Posted October 4, 2021 Test the operation of the unit before reassembling... Quote Link to comment Share on other sites More sharing options...
Acid House 1988 Posted October 4, 2021 Author Share Posted October 4, 2021 And while I've got the covers off I got to work on cleaning off some stubborn tar stains on the front surface... job done and time to reassemble... Quote Link to comment Share on other sites More sharing options...
Acid House 1988 Posted October 4, 2021 Author Share Posted October 4, 2021 Reassembly complete... take care to located the mirrors correctly before pressing in, then re-seat the covers. Thgis needs a bit of car as you need to locate the lower two clips in the lugholes first whilst simultaneously ensuring the innner face sits inside the housing, its a kind of down-then-in type of motion but once you've done the first mirror the second on is easy... job done. colinmcg71 1 Quote Link to comment Share on other sites More sharing options...
Acid House 1988 Posted November 2, 2021 Author Share Posted November 2, 2021 After a few weeks of bad weather I finally managed to progress the next job on the car.... the fog light surrounds. After watching various YouTube videos and seeing other social media posts (“It’s easy!”), two failed attempts later with the recommended credit cards had left me scratching my head. However, the failure of one of the side light bulbs meaning I had to remove the headlight to replace it gave me the perfect opportunity to revisit the fog lamps, but ***** hell what a ball-ache! After removing the headlamp which at least give me some light and a better view from “up top,” the engine underpan and the bumper underside apron had to be removed to facilitate access from the rear. I‘ve seen people say they just yanked them off from the front but I didn’t want to risk damaging the bumper. I still struggled to remove the fogs, so i undid the inside fixing which allowed be to prise away the fog lamp assembly and give me better room to work to remove the surround which I did. I started with the N/S passenger side but then ran into further trouble on the driver side as the water bottle obstructs the route in with a socket and you need a mini tool to unscrew the inside fixing, However, after a bit of coaxing it came way to allow me access. I only got a couple of photos as my phone ran out of charge, so the ones you see are the fog lamp assembly with the fixing removed, the driver side showing the water bottle obstruction and the finished job. Next up, black gloss honeycomb grilles and lower bumper spoiler.... Quote Link to comment Share on other sites More sharing options...
Acid House 1988 Posted November 2, 2021 Author Share Posted November 2, 2021 Still haven't done the boot leak but it is garaged... 😅 Quote Link to comment Share on other sites More sharing options...
Acid House 1988 Posted November 16, 2021 Author Share Posted November 16, 2021 Latest additions to the car, both from PaintModz, painted wiper jets for the bonnet and a shark’s fin aerial to replace the standard antenna. Both relatively straightforward to fit, a handy tip on the wiper jets is to drape a towel over the engine bay (see pic) as you remove the bonnet lining, otherwise you get the clips dropping down into the engine compartment. Really happy with these additions, the car’s appearance is improving all the time. (Oh, and a Focus MK3 Owner's Club sticker appeared on the windscreen too. 😄) colinmcg71 1 Quote Link to comment Share on other sites More sharing options...
Acid House 1988 Posted January 11 Author Share Posted January 11 After a period of bad weather, Christmas etc, I finally got to sort the latest addition to the car, Zetec S front grilles and corner grilles. I did source these some time back but the time wasn’t right to install for various reasons. Note to potential upgraders looking to do the same: DO NOT ATTEMPT THIS MOD UNLESS YOU ARE PREPARED TO REMOVE THE FRONT BUMPER COVER. I’ll qualify this by saying I did a fair bit of research beforehand, watched a good few Youtube videos and made a couple of stalled attempts myself... it very quickly became apparent that there’s absolutely no way you can remove the original items with the bumper in situ without damaging the front bumper. This is due to the way the clip fixings attach to the main bumper. There’s one Youtube video I’m thinking in particular which I watched where the guy didn’t remove the bumper and there’s absolutely no way he completed the task without damaging the original grilles, the bumper or both. It’s so much easier with the bumper off, you can access all the fixings from the back and simply pop them out. Having said that, if you’re looking to do this, don’t be too daunted. It looks a big job but in reality it’s not too bad. If you’re methodical and have the right tools (torque screwdrivers and a decent trim kit is all you need really) then the whole thing is relatively straightforward. There is one Youtube video which I found particularly useful in doing this job and I did have this on a laptop to hand while I was doing the job to refer back to. It’s worth doing, just in case you get stuck. Here’s the link to the video, it’s worth watching a few times before you start, just to familiarise yourself with the procedure: https://www.youtube.com/watch?v=W_uixASo058 I’ll not bore everyone with the steps as it’s basically just a case of following the procedure in the video, you can see what I’ve done in the pictures, but here’s a couple of points worth noting: Sounds obvious but get the car on some ramps or at least raised up so you can get proper access to the underneath, as you need to remove the engine floor pan and the bumper apron underneath. I used a couple of breeze blocks as my “ramps” and that was just about sufficient. Also have a couple of towels or mats handy for when the bumper cover comes off so if it does happen to fall on the floor it doesn’t scratch the paint work. I used a couple of “intermediate supports” to catch it as I slid it off and they worked perfectly (see photos). Time wise, you’re looking at a good couple of hours if you take your time so make sure you give yourself that time and have good light so you can see what you are doing. All in all I’m really pleased with the results and the car is starting to look a bit more sporty, I can now book it in to get the front valance fitted which has just been primed & painted in my local paint shop. Pictures to follow once done. colinmcg71 1 Quote Link to comment Share on other sites More sharing options...
Acid House 1988 Posted January 25 Author Share Posted January 25 After what seems like an eternity, I’ve finally made a big stride forward in getting the front end of the car almost finished. Front bumper lower valance now painted and fitted to go with the honeycomb grills recently added. All that is left to do now is a gel badge and dechrome the upper grill section. Starting to look a bit more sporty now. TomsFocus 1 Quote Link to comment Share on other sites More sharing options...
ScouseJon99 Posted January 28 Share Posted January 28 Fair play fella you've done a nice job of changing the look of your motor, of course it helps that you have the best colour to start with Quote Link to comment Share on other sites More sharing options...
Acid House 1988 Posted January 28 Author Share Posted January 28 It's getting there but it's slow going to do stuff in winter when you're hampered with limited daylight and bad weather! Trying to keep chipping away at it though and hopefully will be looking half decent by the spring... 😎 Quote Link to comment Share on other sites More sharing options...
ScouseJon99 Posted January 28 Share Posted January 28 Keep plugging away and it will be looking how you want it in no time mate👍 Acid House 1988 1 Quote Link to comment Share on other sites More sharing options...
Acid House 1988 Posted February 11 Author Share Posted February 11 Quick "work in progress" post... new calipers painted yellow for when I do the brakes... ScouseJon99 1 Quote Link to comment Share on other sites More sharing options...
Acid House 1988 Posted March 1 Author Share Posted March 1 Not so much a "work in progress" photo, more a "work BEFORE progress." 😄 A couple of brake caliper carriers sourced from All Fords in Speke ready for sandblasting then primer and paint... hoping to get these looking something like the calipers above in the next few weeks... 👍 Quote Link to comment Share on other sites More sharing options...
Acid House 1988 Posted March 11 Author Share Posted March 11 Amazing what a huge difference sandblasting can make from the previous picture... and all for a minimal cost of £10.00. Carriers now ready for priming and painting. Quote Link to comment Share on other sites More sharing options...
Acid House 1988 Posted March 21 Author Share Posted March 21 Finally got the side skirts fitted after few delays and the exterior car is now really starting to take shape. The warmer weather means I can also now look at finishing off the front end by de-chroming the upper grille and adding a new colour coded gel badge. TomsFocus 1 Quote Link to comment Share on other sites More sharing options...
Acid House 1988 Posted March 21 Author Share Posted March 21 Getting the side skirts on meant I could also now fit the front pair of Rallyflapz Shorties this weekend which not only look good but will help protect the new skirts from heavy stone chips etc. Happy with the results. Quote Link to comment Share on other sites More sharing options...
Acid House 1988 Posted April 8 Author Share Posted April 8 Brake calipers and carriers now fully painted and ready to go... new discs and other essentials on order awaiting delivery. Ivo Fidalgo 1 Quote Link to comment Share on other sites More sharing options...
Acid House 1988 Posted April 26 Author Share Posted April 26 The Easter holiday and good weather gave me an opportunity to make a lot of progress on the car, so I got going... The rear bumper was removed to go into the local body shop for paint upgrade (which I’ll save for a later post) so I had a relatively short space of time (just over a week) to complete a number of jobs which I'll post up as time permits... So in no particular order here goes... Dechrome Front Upper Grille After looking into vinyl wrapping I could have either done it myself and possibly made a poor job or look at an alternative such as Plasti-Dip. I went with the Plasti-Dip as a it was only a small area to be covered and it just seemed like the easier option. I eventually gave it 5 coats to reach the desired opacity with 15 minutes to dry between each coat. Photos here show the masking (took no chances) and the finished item. Quote Link to comment Share on other sites More sharing options...
Acid House 1988 Posted April 30 Author Share Posted April 30 Gel Badges Once the grille had been painted I added the gel badges to the front grille and steering wheel from DMB graphics. Areas around the badges were masked up to avoid any potential damage from the heat gun but it wasn’t on too fierce a setting and the additional heat provided additional adhesion for the glue on the badges. All areas were cleaned off with an alcohol rub prior to fixing the badges. Photos here show the areas masked while heating took place and the finished items. Quote Link to comment Share on other sites More sharing options...
Acid House 1988 Posted May 9 Author Share Posted May 9 Seal Up Rear Vents and replace insulation I knew from the “boot leak” thread elsewhere on here this would potentially be a bit of a fiddly / messy job so gave myself plenty of time. The first couple of photos show the rear light recesses and the areas where the water tracks down and hit the vents. From the pics it can be seen the rear 2 vents were letting most of the water in by the marks on the metal. Once this had been identified all areas were cleaned off in preparation for reassembly. All the insulation inside was taken out (sodden with water – see photo) and the area inside cleaned and dried. A quick spray with Dinitrol to prevent any corrosion and then the area was wiped down and new insulation cut to size and inserted. I tried to leave a small gap to allow air to circulation and also drilled a hole in the rubber grommets. The vents were cleaned and prepped ready for reseating and sealing. For the sealing I used Sikaflex 221 which acts as a sealant and an adhesive so once in place there’s nothing getting through to that new liner insulation. All sealed up, tidied up and left to cure. Quote Link to comment Share on other sites More sharing options...
Acid House 1988 Posted May 9 Author Share Posted May 9 Refurbish & paint rear crash bar When the bumper was removed the crash bar was in a bit of a sorry state so I decided to wire brush all the corrosion off the bar and then treat the whole thing with 2 coats of Hammerite. I removed the bar from the car for this as it was far easier to do than on the vehicle. When replacing the crash bar I was a little concerned about the metal on metal between the bar and the body so made a couple of inserts to sit between the car body and the crash bar fixing to act as an interface and to protect both fittings. This was just 3mm expanded foam insulation board with a liner on one side. The crash bar was then re-attached and screwed firmly back into place. Note in the last photo I've trimmed back the exhaust pipe as the new lower bumper extension to go on is from an ST so I'm converting to a central tail pipe. Quote Link to comment Share on other sites More sharing options...
Recommended Posts
Join the conversation
You can post now and register later. If you have an account, sign in now to post with your account.