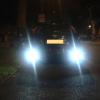
Makefish Posted July 5, 2012 Share Posted July 5, 2012 I cannot stand the 'fried egg' look of orange bulbs and have changed to clear on every new car I get, I've managed to do the fronts OK but the rears are not shown in the handbook and are proving to be a bit more tricky and was wondering if anyone has successfully gone about accessing the rear light cluster and could give me a mini 'how to'. FYI Car is a 2.0 Tdci Titanium Estate MY12. Edit: Well I decided to have a go at this myself and you'd think changing a light bulb would be a simple process however, it took two people and a lot of cursing before the job was finally done. As a result I thought I'd change the thread into a 'How To', hopefully this might help a few avoid a few problems when attempting it themselves! 1. I hate 'fried egg' look indicators so this is what we are trying to get at but of course there are a multitude of other bulbs in here that you may want to get at! 2. Finding the plastic screw fixings is the first task, there are two for each cluster situated inside the rear cubby holes in the boot. 3. What you are trying to get to are these plastic screws, they are relatively easy to find but very awkward to get a decent grip unless you have small hands! (apologies for the poor quality of these pics) 4. Now that you've found them the fun starts. These have obviously been tightened at the factory and plastic against metal seems to lock them in place with no obvious way of loosening them. In the end I got my son to push the light from the outside while I was trying to free them on the inside, this seemed to work as this external pressure helped release the fixings but only after the help of a few tools. OK so the key didn't work and the small flat headed screw driver was not much use either but if you can find the room and get some grips around it this does help with leverage. Some bright spark is going to tell me that there is a special tool for this exercise but I ain't got it! Warning: Go careful with any pressure you put on the light cluster, the last thing you want is a bill to replace the whole thing! 5. These are the little bleeders you're trying to remove .. 6. Now that these fixing have been removed you now have to carefully prise the cluster away from the body work. There are two addition press fit type lugs that 'pop' into the bodywork so gently prise around the edges until they are free. 7. You should have in your hand one (undamaged!) rear light cluster. You're now free to change what you wish but in my case it was to get rid of the orange indicator bulbs. For safety you may want to disconnect the wiring loom but I did not bother. 8. Now go through the process in reverse to put it all back again. Tip: You may want to add a washer or smear a dab of 3 in 1 to make it easier the next time round. Finally the obligatory disclaimer. I will not be held responsible for any breakages or damage caused by others as a result of following this guide. Hope this helps. 2 Quote Link to comment Share on other sites More sharing options...
Makefish Posted July 5, 2012 Author Share Posted July 5, 2012 As there is no info on the estate in the handbook I've modified first post into a 'How To'. Quote Link to comment Share on other sites More sharing options...
Lenny Posted July 5, 2012 Share Posted July 5, 2012 looks good mate, perhaps fit some cree Q5 reverse bulbs too Quote Link to comment Share on other sites More sharing options...
Stoney871 Posted July 5, 2012 Share Posted July 5, 2012 Just got some silvertec type bulbs for my car (only a lowly MK2), thankfully just 2 screws and a pull (story of my life :P) 1 Quote Link to comment Share on other sites More sharing options...
Patternwalker Posted August 3, 2017 Share Posted August 3, 2017 I would love to see your "how to" on accessing the rear light cluster for my estate but unfortunately the pictures aren't displaying - instead there's a message from Photobucket regarding upgrading your account for 3rd party hosting. Are the pictures available anywhere else? Thanks. Quote Link to comment Share on other sites More sharing options...
Albacore Posted January 5, 2019 Share Posted January 5, 2019 Be extremely careful when removing the cluster! One of my pressfit lugs released OK but the one at the front end stayed engaged, so the cluster swivelled against the front edge, breaking off some of the red plastic! It sounds like a rookie mistake, but it happened all too easily. Hopefully it will glue back on successfully. It might be best to insert some kind of plastic pry bar behind the lugs to release them. Also the frontmost of the 2 plastic nuts on mine was well and truly seized and it is very inaccessible. I ended up partially removing the luggage cover rail (torx screw and a few plastic clips), which gives much better access. The whole thing is a 'mare compared to the Mk2 which was dead easy - the Mk3 is almost as bad as the nearside headlamp bulb on the Mk1! Lance 1 Quote Link to comment Share on other sites More sharing options...


Recommended Posts
Ford UK Shop
Sponsored Ad
Name: eBay
Ford Model: FordUK Shop
Ford Year: 2024
Latest Deals
Ford UK Shop for genuine Ford parts & accessoriesDisclaimer: As the club is an eBay Partner, The club may be compensated if you make a purchase via the club
Join the conversation
You can post now and register later. If you have an account, sign in now to post with your account.