Brigante Posted July 25, 2012 Share Posted July 25, 2012 Carbon wrapped head unit and gear leaver surrounds Custom heating controls Carbon wrapped demister surround Carbon wrapped steering wheel LED foot-wells Installed and carbon wrapped garage door New pedal set LED map reading lights Better LED foot-wells My single LED side light (passenger side head light being awkward and not coming out, hopefully sort it tomorrow) Quote Link to comment Share on other sites More sharing options...
.Ryan Posted July 25, 2012 Share Posted July 25, 2012 Like the blue interior lights! Quote Link to comment Share on other sites More sharing options...
Paddy H Posted July 25, 2012 Share Posted July 25, 2012 Footwells do look good, so does the new pedals. What bulbs are you using for headlights? Done well at wrapping, valiant effort, look much better. Quote Link to comment Share on other sites More sharing options...
Brigante Posted July 26, 2012 Author Share Posted July 26, 2012 Finally managed to get my stuck headlight unit out with 3 well positioned screwdrivers, installed the other LED parking light With the flash on my camera turned on Bright enough? Gonna do the main and dipped beams next then the fogs Quote Link to comment Share on other sites More sharing options...
Lenny Posted July 26, 2012 Share Posted July 26, 2012 looks brilliant mate, the pedals look good too and the blue ligh shows them up nicely, its all coming togeather now. B) Quote Link to comment Share on other sites More sharing options...
Brigante Posted July 26, 2012 Author Share Posted July 26, 2012 looks brilliant mate, the pedals look good too and the blue ligh shows them up nicely, its all coming togeather now. B) Starting to mate.. Gotta finish sorting out nob head's bodge jobs as I go along while trying to do what little mods I can. Quote Link to comment Share on other sites More sharing options...
Brigante Posted July 27, 2012 Author Share Posted July 27, 2012 Butchered the garage door unit with a dremel and I now have power back to it :D Quote Link to comment Share on other sites More sharing options...
Lenny Posted July 27, 2012 Share Posted July 27, 2012 Butchered the garage door unit with a dremel and I now have power back to it :D made a nice tidy job of that mate, looks good. Quote Link to comment Share on other sites More sharing options...
MrGrumpy Posted July 27, 2012 Share Posted July 27, 2012 Liking it so far, what LED's did you go for in the footwells and sidelights? Also your interior light does it have Submarine lighting or just a standard map light with blue led's? Quote Link to comment Share on other sites More sharing options...
Brigante Posted July 27, 2012 Author Share Posted July 27, 2012 Liking it so far, what LED's did you go for in the footwells and sidelights? Also your interior light does it have Submarine lighting or just a standard map light with blue led's? I've got these in my foot wells http://www.ebay.co.uk/itm/130689922599?ssPageName=STRK:MEWNX:IT&_trksid=p3984.m1439.l2649 these in my sidelights http://www.ebay.co.uk/itm/220986447355?ssPageName=STRK:MEWAX:IT&_trksid=p3984.m1438.l2649 and these in my map lights mate http://www.ebay.co.uk/itm/320876815092?ssPageName=STRK:MEWAX:IT&_trksid=p3984.m1438.l2649 gonna get one of these for my courtesy light http://www.ebay.co.uk/itm/350573075497?ssPageName=STRK:MEWAX:IT&_trksid=p3984.m1438.l2649 and some more white ones for the lights in my sun visor mirrors Quote Link to comment Share on other sites More sharing options...
Brigante Posted July 27, 2012 Author Share Posted July 27, 2012 made a nice tidy job of that mate, looks good. Cheers mate, dunno how I ever did without a dremel, it's a very handy tool and everyone should have one Quote Link to comment Share on other sites More sharing options...
Lenny Posted July 27, 2012 Share Posted July 27, 2012 Cheers mate, dunno how I ever did without a dremel, it's a very handy tool and everyone should have one totally agree mate, the are a fantastic tool but safety glasses is a must have item along with the dremel tool, i reckon they should sell an extension lead with a foot pedal similar to a sowing machine pedal, so then we could plug in the dremal and start/stop using the footpedal would be much safer. Quote Link to comment Share on other sites More sharing options...
MrGrumpy Posted July 27, 2012 Share Posted July 27, 2012 I've got the same in my footwells.. so bright :) matches my door handle LED's I have the same but white in my sidelights Quote Link to comment Share on other sites More sharing options...
Brigante Posted July 27, 2012 Author Share Posted July 27, 2012 was gonna get the same as you for my sidelights but already had my current ones so i put these in Quote Link to comment Share on other sites More sharing options...
Brigante Posted July 27, 2012 Author Share Posted July 27, 2012 totally agree mate, the are a fantastic tool but safety glasses is a must have item along with the dremel tool, i reckon they should sell an extension lead with a foot pedal similar to a sowing machine pedal, so then we could plug in the dremal and start/stop using the footpedal would be much safer. yup can be a bit awkward having the speed and the power button on opposite sides when trying to reach round and switch it off while it's still running lol Quote Link to comment Share on other sites More sharing options...
MrGrumpy Posted July 27, 2012 Share Posted July 27, 2012 Still look nice and bright :) Quote Link to comment Share on other sites More sharing options...
Brigante Posted August 1, 2012 Author Share Posted August 1, 2012 These come today, got one on each tear window :) Oh and check my tax disk holder lol Mist washer jets also came today but it's hard to get a photo of them in action lol great little mod though My Halfords ultra brilliance H7 bulbs came today too My Osram H1's will be delivered tomorrow and my cree reverse lights should hopefully be here soon. Mods to do hopefully in the near future are the second reverse light and the rear LED foot-wells But if any of you have read my recent topic, you will know I had yet another run in with a lorry today :( result: rear bumper now needs replacing. Contemplating an ST rear bumper. Quote Link to comment Share on other sites More sharing options...
.Ryan Posted August 2, 2012 Share Posted August 2, 2012 Looking good mate. Quote Link to comment Share on other sites More sharing options...
Brigante Posted August 2, 2012 Author Share Posted August 2, 2012 Looking good mate. Not looking good if you see my rear bumper :( Do you reckon I could fit a mk3 bumper to my mk2? Obviously I'd need the new reverse lights but is the fitting different or would it bolt straight on? Quote Link to comment Share on other sites More sharing options...
Lenny Posted August 2, 2012 Share Posted August 2, 2012 Not looking good if you see my rear bumper :( Do you reckon I could fit a mk3 bumper to my mk2? Obviously I'd need the new reverse lights but is the fitting different or would it bolt straight on? yes the mk2.5 facelift focus rear bumper will fit your mk2 direct replacment part, providing their is no structural dammage preventing the fitment of the bumper. in the event that you need to drive around without the bimper for a while see my thread here http://www.fordownersclub.com/forums/topic/32690-reduce-reuse-and-recycle/page__hl__%2Breduce+%2Breuse+%2Brecycle also as said you will need the reverse and fog light unit, but if you are buying them then purchase two clear units one for each side then use your existing fog or reverse unit to create the additional port for the fog light on the side of the RH clear unit. you will also require two loom plugs they plug in to the rear of the bulb sockets and are different on the mk2 compared to the mk2.5 so if creating the dual reverse then you can use the original plug for the fog light unit and bond your existing fog liht to the side of the new clear mk2.5 unit, then purcase two mk2.5 loom plugs for both reverse unit bulb sockets. i can guide you through the removal and fitment of the bumper if required start a new thread or PM me, so as we dont clog your thread. i havent got a clear picture of the plug itself but it looks like this for the mk2.5 Quote Link to comment Share on other sites More sharing options...
Brigante Posted August 2, 2012 Author Share Posted August 2, 2012 yes the mk2.5 facelift focus rear bumper will fit your mk2 direct replacment part, providing their is no structural dammage preventing the fitment of the bumper. in the event that you need to drive around without the bimper for a while see my thread here http://www.fordowner...+reuse +recycle also as said you will need the reverse and fog light unit, but if you are buying them then purchase two clear units one for each side then use your existing fog or reverse unit to create the additional port for the fog light on the side of the RH clear unit. you will also require two loom plugs they plug in to the rear of the bulb sockets and are different on the mk2 compared to the mk2.5 so if creating the dual reverse then you can use the original plug for the fog light unit and bond your existing fog liht to the side of the new clear mk2.5 unit, then purcase two mk2.5 loom plugs for both reverse unit bulb sockets. i can guide you through the removal and fitment of the bumper if required start a new thread or PM me, so as we dont clog your thread. i havent got a clear picture of the plug itself but it looks like this for the mk2.5 Nice one Lenny, waiting for a bloke to get back to me then hopefully I'll be able to buy a mk2.5 bumper. It will be a complete one though so it'll have the normal lights, so I'll still have to buy a clear driver-side light for the second reverse light. Quote Link to comment Share on other sites More sharing options...
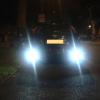
Brigante Posted August 2, 2012 Author Share Posted August 2, 2012 Osram H1's came today so just been outside to get some quick night shots Parking lights Dipped beam High beam View from inside Random other shots lol Whats everyone reckon? bright enough? I still maintain though, even though they look nice and white in photo's, I still think they still look yellow when actually standing in front of them are they supposed to? Oh and went to de-badge the rear today, but the previous lady owners obviously haven't looked after the paintwork Can anyone advice on the best way of touching this up so there won't be random white patches when I de-badge? I have a colour matched spray can from Halfords with a can of primer and lacquer as well, I also have a Halfords scratch repair kit which I haven't got round to using properly yet. Quote Link to comment Share on other sites More sharing options...
jg321 Posted August 3, 2012 Share Posted August 3, 2012 You sure the stuff around the ghia badge isn't polish? Quote Link to comment Share on other sites More sharing options...
Brigante Posted August 3, 2012 Author Share Posted August 3, 2012 You sure the stuff around the ghia badge isn't polish? Haven't looked properly I'll have a better look tomorrow but it looked more like the paints come off, not sure how it would have happened though. But the car don't look like its been polished in a long time so if it is polish god knows how long its been on there. Quote Link to comment Share on other sites More sharing options...
artscot79 Posted August 3, 2012 Share Posted August 3, 2012 if you want white lights then i use these and believe me theres no yellow to them at all Philips Diamond Vision 5000K and headlights and fogs on the front http://www.ebay.co.u...=item4d01dfb005 parking lights not a great pic as the streetlamp is right next to the car as you seee from the pics they work well you are aware that Halfords bulbs are in fact very cheap bulbs at a massive mark up. Quote Link to comment Share on other sites More sharing options...


Recommended Posts
Ford UK Shop
Sponsored Ad
Name: eBay
Ford Model: FordUK Shop
Ford Year: 2024
Latest Deals
Ford UK Shop for genuine Ford parts & accessoriesDisclaimer: As the club is an eBay Partner, The club may be compensated if you make a purchase via the club
Join the conversation
You can post now and register later. If you have an account, sign in now to post with your account.